Multi Hover Effect On Blogger Images Using Pure CSS

13.52 0
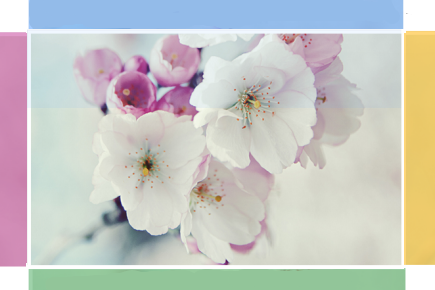
Today I'm going to show you how to add an amazing mouseover effect for Blogger images using only CSS, in which moving your mouse over an image from different directions (from above, from below, etc) will cause an overlay transitioned in from the same vector. This trick will change not only the images appearance when moving mouse over them, but will also allow you to add inside a text with a description.

hover effect, mouseover, blogger hover effects

You can see the effect on this image below: try moving your mouse from the left, right, and above.

hover right hover top hover left hover bottom

Adding Hover Effect From Different Directions on Blogger Images

First thing to do is to add the CSS style to our Template:

Step 1. From Blogger Dashboard, go to Template and press the Edit HTML button


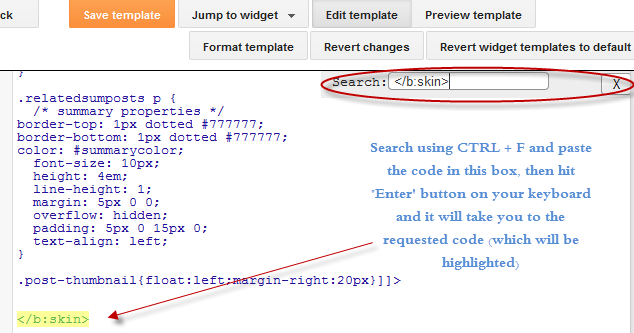
Step 2. Search for the </head> tag - to find it, click anywhere inside the code area, press CTRL + F keys and type it in the search box.


Step 3. After you found it, add the following style just above it: 
<style>
  /* The container and the image */
  div.multi-hover {
    overflow: hidden;
    position: relative;
    vertical-align: middle;
    width: 100%;
    height: 358px;
    line-height: 358px;
  }
  div.multi-hover img {width: 100%;}

/* The texts that, by default, are hidden */
  div.multi-hover span {
    color: #FFF;
    font-size: 32px;
    font-weight: bold;
    height: 100%;
    opacity: 0;
    position: absolute;
    text-align: center;
    transition: all 0.3s linear 0s;
    width: 100%;
  }

/* And this is what will generate the effect */
  div.multi-hover span:nth-child(1) { /* right */
    background: none repeat scroll 0 0 rgba(255, 189, 36, 0.6);
    left: 90%;
    top: 0;
  }
  div.multi-hover span:nth-child(2) { /* top */
    background: none repeat scroll 0 0 rgba(106, 170, 255, 0.6);
    left: 0;
    top: -80%;
  }
  div.multi-hover span:nth-child(3) { /* left */
    background: none repeat scroll 0 0 rgba(204, 87, 166, 0.6);
    left: -90%;
    top: 0;
  }
  div.multi-hover span:nth-child(4) { /* bottom */
    background: none repeat scroll 0 0  rgba(97, 181, 115, 0.6);
    left: 0;
    top: 80%;
  }

  div.multi-hover span:hover {opacity: 1;}
  div.multi-hover span:nth-child(2n+1):hover {left: 0;}
  div.multi-hover span:nth-child(2n):hover {top: 0;}

</style>
Step 4. Save the Template

Now we are going to add the HTML that is nothing but a DIV where we included four SPAN tags with texts and an image:

Step 5. Choose Posts, create a New Post, click on the HTML tab (1) and paste this code inside the empty box:
<div class=multi-hover>
  <span>hover right</span>
  <span>hover top</span>
  <span>hover left</span>
  <span>hover bottom</span>
  <img src="https://blogger.googleusercontent.com/img/b/R29vZ2xl/AVvXsEjxxJqInV9GqcovPAdOk1YRYEWufhJFzlqyUxTO1X_P78amuc5jvMA0X-_8-6N_pS1ByNz3xLptYnbyZa0eqkFAIW_4KK2xRIvaCcehwfJAplWKddRimJAy37IDzLKQpJIqFp2QYvxe4Xc/s1600/flowers">
</div>
Add your own text/description to "hover right", "hover top", "hover left" and "hover bottom" (2) and replace the url in blue with the image URL (3) where you want to apply the effect.
Important! Do not click on the Compose tab, otherwise the changes will be lost.


Step 6. After you finished editing your post, click Publish (4)

And that's it... enjoy! :)
Popular Posts With Automatic Numbering - Bubbles!

12.27 0

Popular Posts Widget

When blogger released Popular Posts widget back in 2011, we leaked out its stylesheet so that you can customize it to blend it perfectly to your BlogSpot templates. Today we will learn how to display the list of popular posts using CSS3 auto increment property. You can style the numbers in variety of shapes, we styled them in square/rectangular and circular shape. you guys were the first to display threaded comments with Comment Counts and today you will again learn something more interesting. You can see a practical demo of this implementation on our sidebar. Lets add this effect to blogger in fairly easy steps using pure styles with no use of JavaScript.

Read more »

Design a Responsive Blogger Template - Tutorial

12.25 0

Design Responsive Blogger TemplateDesigning Mobile Responsive Templates has become a trending topic in web today. Mobile Technology and Mobile Traffic has evolved immensely from 2010 to 2013 especially in Asia USA and Africa. People now prefer reading emails on their iPhone as compared to using their Desktop computer. Fast wireless wifi connections is another reason that encouraged usage of mobile devices like smart phones (Apple and Android), Tablets, netbooks and low resolution cellphones like NOKIA.

More of our clients today are interested in fluid and flexible Blogger templates compared to traditional Fixed width Layouts. We have received over a hundred requests for this tutorial series. We are therefore releasing the first ever complete step by step Tutorial Guide on Mobile Optimized Responsive Blogger Templates to the Google Blogger Community. You will learn how to enable your Blog layout adjust itself automatically to the Device Screen Size.

Read more »

Drawbacks of JQuery Lazy Load Plugin For Posts and Images

12.29 0

Lazy Load For blogger blogsJquery and CSS3 has enabled front end developers and even designers to create amazing effects but unless you check the compatibility of the code, never play with such plugins and tools because there are still people who don't use JavaScript in their browsers and your blog will look no less than a mess to them. This effects both your readership and blog pageviews. We are observing a growing trend of Jquery implementation on both Blogger and Wordpress blogs. A Famous known plugin is Lazy Load for images (inspired from Yahoo plugin) and Lazy Load for blogger posts (Also called infinite scrolling). Lazy load for images delays loading of images in long web pages and makes the page load faster, on the other hand Infinite Scrolling plugin for Blogger keeps on loading posts as you scroll down the page just like you scroll down to load more tweets in twitter.

Read more »

How To Add Social Media Icons to Blogger Header

16.22 0
social media icons, facebook icons, social media icons for bloggerThis tutorial will help you to add social media icons in the top right corner of the page which could increases the likelihood that readers can follow through the various social networks. There are several ways to do this, like adding a new widget section to the blog header but now, we'll do it using an unordered list that uses icons of Facebook, Twitter, Google+ and blog feed, and as a bonus, the icons will rotate when you hover over them.

You can see a demo in this test blog.


Adding Social Media Icons to Blogger Header

Step 1. From your Blogger dashboard, go to Template and click on the Edit HTML button:

blogger blogspot, blogger template, blogger gadgets

Step 2. To expand the style, click on the small arrow on the left of <b:skin>...</b:skin> (screenshot 1), then click anywhere inside the code area to search (using CTRL + F) for the ]]></b:skin> tag (screenshot 2) and add this code just above it:

 /* Social icons for Blogger
----------------------------------------------- */

#social-icons {
margin-bottom:-30px;
height:50px;
width:100%;
clear:both;
z-index: 2;
position: relative;
}
.social-media-icons {
display:table
}
.social-media-icons ul {
text-align:right;
padding:5px 5px 0 0
list-style-image:none;
list-style-position:outside;
list-style-type:none;
}
.social-media-icons ul {
margin-bottom:0;
padding:0;
float:right;
}
.social-media-icons li.media_icon {
margin-left:6px;
padding-left:0 !important;
background:none !important;
display:inline;
float:left;
}
.social-media-icons li:hover {
-moz-transform: rotate(360deg);
-webkit-transform: rotate(360deg);
-o-transform: rotate(360deg);
transform: rotate(-360deg);
-moz-transition: all 0.5s ease-in-out;
-webkit-transition: all 0.5s ease-in-out;
-o-transition: all 0.5s ease-in-out;
-ms-transition: all 0.5s ease-in-out;
transition: all 0.5s ease-in-out;
}

Screenshot 1:


Screenshot 2:


Step 3. Now search for this line

<b:section class='header' id='header' maxwidgets='1' showaddelement='no'>

Step 4. And just above it, add this code:

<div class='social-media-icons' id='social-icons'>
<ul>

<li class='media_icon'><a href='http://facebook.com/username'><img border='0' src='https://blogger.googleusercontent.com/img/b/R29vZ2xl/AVvXsEg8z1mG55HTkVxDV-I-Fbw-arVvie9089tx4LWPTAvbc7lBEe2CIgrzj3RBBOkL50Nx3P-_mohmC4Vxt_JSRwGvpSFyC4YciTeXpnA8jff2tChWJ1PptWd5twSeqzes69ZEqwn0T53peUk/s1600/Facebook.png'/></a></li>

<li class='media_icon'><a href='http://twitter.com/#!/username'><img border='0' src='https://blogger.googleusercontent.com/img/b/R29vZ2xl/AVvXsEhFeu_q87uBmroory0vuoA-1NH6FaUgSkvJ2_Yl7JQtKdKNMmN-G8UPl0F_g51MIdIX8QOcwfp4u6jH6rXAe32UlWbni9rHYKNgm2ynvJnw4XZuVIFIloAo_E0lsp5DeP9BgRcteYl0o6c/s1600/Twitter.png'/></a></li>

<li class='media_icon'><a href='https://plus.google.com/XXXXXXXXXXXXXXXXXX/about'><img border='0' src='https://blogger.googleusercontent.com/img/b/R29vZ2xl/AVvXsEhw78LmIjHzUtPELzmixOuRPmeCMk7yjGBjCbMD7JfD6Gs6ozD-fws78J3aTslX6WPJlg9ypNQ1PCAXkqqemfpHTnaaHrHlUPqB8G0Szjb345ljqrXKbQENhdXBY_gBSRQB7Q66C87qSpw/s1600/googleplus.png'/></a></li>

<li class='media_icon'><a href='http://name-of-your-blog.com/feeds/posts/default'><img border='0' src='https://blogger.googleusercontent.com/img/b/R29vZ2xl/AVvXsEhaqH9Lhrk9Cq00vsL3veI8Wrsu08zxffC5VWPPDeWdn7gqfmETKpe5w-8zvVaNPy7Dfl3D94kxUm0w9U7MtxPDxkSBH59089o04uB-jhCNHtMd5iaJ8U5tivz0zPfNFJm6go_dZZ62t5s/s1600/RSS.png'/></a></li>

</ul></div>

Customization

- Change what's in red with your usernames and id: the first is your Facebook username, the second is that of Twitter, in the third you should change the X by the ID of your Google+ profile and in the fourth you will put the name of your blog.
- To change the icons, just replace the urls in blue with the ones of your images.
- You can add more icons if you want, you just have to add before </ul></div> a line like this for each extra icon you want:

<li class='media_icon'><a href='Link URL'><img border='0' src='Image URL'/></a></li>

Step 5. Finally, Save the Template to apply the changes.
The effect is done with CSS3, so this effect will not work in older browsers.

Create a Custom Contact Form For Blogger - Part 2

11.37 0

Custom Blogger Contact FormIn the first part of our series you learnt how to add a contact Form to your BlogSpot blog and control its display settings. Today you will learn how to change its stylesheet to reflect your custom styles with a more appealing design. You will learn today how to customize the Form input fields, add icons to it, add a "Clear Button"  and play several tricks with your custom form. The form is built using XHTML Get or Post Methods unlike PHP Forms which are used widely today. If you have not referenced the first part of our tutorial then kindly read it first:

Read more »

Fading Box With Newer/Older Posts Links and Titles for Blogger

16.41 0
The navigation links are those that appear at the bottom of the page that says "Older Posts", "Newer Posts" and "Home" and help us to move through the blog posts. This tutorial will show you how to change the word "Older Posts" and "Newer Posts" for post titles and make these to appear in a box "fading" when you scroll down the page.
blogger gadgets, navigation for blogger

You can see it in action on this demo blog - when you scroll down, the navigation links will appear showing the post titles for the older/newer entries.

This way to display the navigation links will be seen only in individual entries, while those on the homepage and other parts of the blog will still be displayed as usual.

How to Add Navigation Box with Newer & Older Posts on Blogger

Step 1. From your Blogger Dashboard, go to Template > Edit HTML, click anywhere inside the code area and search - using CTRL + F - for this line:

<b:include name='nextprev'/>

Screenshot:

Step 2. REPLACE the code above with this one:

<b:if cond='data:blog.pageType != &quot;item&quot;'>
<b:include name='nextprev'/>
</b:if>
<b:if cond='data:blog.pageType == &quot;item&quot;'>
<div id='blog-pager-box'>
<h4>Other posts published:</h4>
<b:include name='nextprev'/>
</div>
</b:if>

Note: you can change the "Other posts published" title with your own

Step 3. Now add just above </head> the following code:

<b:if cond='data:blog.pageType == &quot;item&quot;'>
<script src='http://ajax.googleapis.com/ajax/libs/jquery/1.8.2/jquery.min.js' type='text/javascript'/>
<script>
// <![CDATA[
$(function() {
$('#blog-pager-box').toggle()
.css({
width: '520px',
height: '150px',
position: 'fixed',
padding: '1em',
bottom: 0,
right: 0,
background: 'url(https://blogger.googleusercontent.com/img/b/R29vZ2xl/AVvXsEg93GSbikopinvhCLWm_tAxIelUGNtoSZ2sgyMENYvEOxKtisKGO-cPR34dUghu1tSam-rXw0ivveliR_ieUL8HLi5LEAY51XoFxrgXebm1FVo54lqNu_zn2FCjkEjj0S8ST6kNntAfcOS6/s1600/paper.jpg)'
});

$(window).scroll(function() {
if($(this).scrollTop() > 100) {
$('#blog-pager-box').fadeIn();
} else {
$('#blog-pager-box').fadeOut();
}
});
});
$(document).ready(function(){
var newerLink = $("a.blog-pager-newer-link").attr("href");
$("a.blog-pager-newer-link").load(newerLink+" .post-title:first", function() {
var newerLinkTitle = $("a.blog-pager-newer-link:first").text();
$(".blog-pager-newer-link").html("<div>Newer Posts:</div>" + newerLinkTitle);
});
var olderLink = $("a.blog-pager-older-link").attr("href");
$("a.blog-pager-older-link").load(olderLink+" .post-title:first", function() {
var olderLinkTitle = $("a.blog-pager-older-link").text();
$(".blog-pager-older-link").html("<div>Older Posts:</div>" + olderLinkTitle);
});
});
// ]]>
</script>

<style type='text/css'>
<!--
#blog-pager-box {
box-shadow: 0 0 3px #AEAEAE;
z-index:9;
}

#blog-pager-box h4 {
margin:0;
padding:0;
color:#4898B9; /* Widget's title color */
font-size:16px; /* Title font size */
}

#blog-pager-newer-link {float:left;clear:both;line-height:30px;}
#blog-pager-older-link {float:left;clear:both;line-height:30px;}
.home-link {display:none;}
.blog-pager-older-link, .blog-pager-newer-link {
background-color: transparent !important;
background-image: none !important;
border:0 !important;
color: #4B4B4B !important; /* Color of the links */
float: left;
width: 500px;
clear:both;
}

a.blog-pager-older-link:hover, a.blog-pager-newer-link:hover {
text-decoration:none !important;
}
 
a.blog-pager-newer-link:before {
content: url(https://blogger.googleusercontent.com/img/b/R29vZ2xl/AVvXsEiiHlCv1_HNbzkQqT9AKearq-fDzj2-k3Yp6mIKq8rzgcHN-QU8h6Ik1V6Cezz9TCOJb3RssmN46oL5gXtSsoH_g-NM0V1SQIoE85DSn0lG2OFt8dq2H7TtR1rl9SdtTXn64-czDAFRqew/s1600/back.png);
float:left;
}
a.blog-pager-older-link:before {
content: url(https://blogger.googleusercontent.com/img/b/R29vZ2xl/AVvXsEiR2nTTV_x8vOypZShTzFNNWQVPs7eh0a31FoUQmVQ0dYe7grhy7ufGc4YDr5E6efdwiJXTZKu0ZhKQAoThAKXzXdIElOXxGTLX0-1Qy3zZY7JEoqRXEZBuejISEY5HKdd4sVOXX8V6GnI/s1600/forward.png);
float:left;
}
#blog-pager {
width:500px;
background-color: transparent !important;
background-image: none !important;
border:0 !important;
text-align:left;
}
 
#blog-pager div {
color:#0577AB; /* Color for the "Newer Posts" and "Older Posts" text */
font-weight:bold;
margin-bottom: -5px;
}
a#blog-pager div:hover {
text-decoration:none !important;
color:#4898B9; /* Color for the "Newer Posts" and "Older Posts" text */
}
-->
</style>
</b:if>

Note that this gadget uses jQuery, so try to have only one version.


Customization:


- There are three URLs in blue, the first is the paper background image for the box, the other two are the icons that correspond to the arrows. You can replace these with your own.
- In green you can see where to change the text colors.
- The red number is the distance in pixels that activates the gadget, this means that the box will appear when you scroll down the 100px. You can use a higher value if your posts are usually long and therefore the "height" of the scroll is greater.
Step 4. Now, Save the Template and that's it!

You can also change the "Older Posts" and "Newer Posts" links with posts titles or images.

New Blogger Widget: Contact form - Change Style & Install in a Static Page

18.20 0
Just a few days ago, Blogger introduced a new widget. It is about a contact form that you can add to your blog easily. It is very basic, because - at least for now, does not permit incorporating files or send anything other than plain text.

The contact form for Blogger has the following features:
  • Field for the user name
  • Field for email
  • Field for the message (textarea)
  • Submit Button
Screenshot
contact form, blogger gadgets, static page
 The design is simple and the text colors inherit the section where you add it. At the moment, this widget has no configuration options and is not available for dynamic views.

How to Add Contact Form to Blogger

To add it to your blog, just select the Layout tab, then click on Add a gadget in the section you want to show, for example, in the sidebar. Then, select the More gadgets tab and add the Contact Form gadget.


blogger gadgets, blogger widgets, contact form

Styling Contact Form


As the background is transparent, the form will integrate well, aesthetically speaking, but nevertheless it is easy to modify using Style Sheets (CSS) to the appropriate selectors. Here's an example:

/* Contact Form Container */
.contact-form-widget {
width: 500px;
max-width: 100%;
margin: 0 auto;
padding: 10px;
background: #F8F8F8;
color: #000;
border: 1px solid #C1C1C1;
box-shadow: 0 1px 4px rgba(0, 0, 0, 0.25);
border-radius: 10px;
}

/* Fields and submit button */
.contact-form-name, .contact-form-email, .contact-form-email-message {
width: 100%;
max-width: 100%;
margin-bottom: 10px;
}

/* Submit button style */
.contact-form-button-submit {
border-color: #C1C1C1;
background: #E3E3E3;
color: #585858;
width: 20%;
max-width: 20%;
margin-bottom: 10px;
}

/* Submit button on mouseover */
.contact-form-button-submit:hover{
background: #4C8EF9;
color: #ffffff;
border: 1px solid #FAFAFA;
}

This is how it will look like after applying the style:
contact form, blogger gadgets, contact form for blogger

To add this style, go to Template > Edit HTML, click on the sideways arrow next to <b:skin>...</b:skin> and paste the code just above ]]></b:skin> (press CTRL + F to find it):


How To Add Contact Form In A Static Page


First step is to add the Contact Form gadget (Layout) and second, to edit the template (Template > Edit HTML) to remove most of the gadget. You have to search for the id "ContactForm", expand the widget by clicking on the black arrow on the left (same with the includable) and then delete the part that I have colored in red (see below):

Part to be removed:

  <b:widget id='ContactForm1' locked='false' title='Contact Form' type='ContactForm'>
    <b:includable id='main'>
  <b:if cond='data:title != &quot;&quot;'>
    <h2 class='title'><data:title/></h2>
  </b:if>
  <div class='contact-form-widget'>
    <div class='form'>
      <form name='contact-form'>
        <p/>
        <data:contactFormNameMsg/>
        <br/>
        <input class='contact-form-name' expr:id='data:widget.instanceId + &quot;_contact-form-name&quot;' name='name' size='30' type='text' value=''/>
        <p/>
        <data:contactFormEmailMsg/> <span style='font-weight: bolder;'>*</span>
        <br/>
        <input class='contact-form-email' expr:id='data:widget.instanceId + &quot;_contact-form-email&quot;' name='email' size='30' type='text' value=''/>
        <p/>
        <data:contactFormMessageMsg/> <span style='font-weight: bolder;'>*</span>
        <br/>
        <textarea class='contact-form-email-message' cols='25' expr:id='data:widget.instanceId + &quot;_contact-form-email-message&quot;' name='email-message' rows='5'/>
        <p/>
        <input class='contact-form-button contact-form-button-submit' expr:id='data:widget.instanceId + &quot;_contact-form-submit&quot;' expr:value='data:contactFormSendMsg' type='button'/>
        <p/>
        <div style='text-align: center; max-width: 222px; width: 100%'>
          <p class='contact-form-error-message' expr:id='data:widget.instanceId + &quot;_contact-form-error-message&quot;'/>
          <p class='contact-form-success-message' expr:id='data:widget.instanceId + &quot;_contact-form-success-message&quot;'/>
        </div>
      </form>
    </div>
  </div>
  <b:include name='quickedit'/>

</b:includable>
  </b:widget>

After you have saved the template, go to Pages and paste the following code into a new blank page with the title you want:

 <div class='widget ContactForm' id='ContactForm1'>
  <div class='contact-form-widget'>
    <div class='form'>
      <form name='contact-form'>
        <p>Name</p>
        <input class='contact-form-name' id='ContactForm1_contact-form-name' name='name' size='30' type='text' value=''/>
        <p>E-mail *</p>
        <input class='contact-form-email' id='ContactForm1_contact-form-email' name='email' size='30' type='text' value=''/>
        <p>Message *</p>
        <textarea class='contact-form-email-message' cols='25' id='ContactForm1_contact-form-email-message' name='email-message' rows='5'></textarea>
        <input class='contact-form-button contact-form-button-submit' id='ContactForm1_contact-form-submit' type='button' value='Submit'/>
        <p class='contact-form-error-message' id='ContactForm1_contact-form-error-message'></p>
        <p class='contact-form-success-message' id='ContactForm1_contact-form-success-message'></p>
      </form>
    </div>
  </div>
</div>

Messages will be sent to the same email that you have registered in Blogger.

Here's a demo page where you can test it (it is an account that I don't use, so don't expect reply).
That's it! If you have any questions or comments please post below.

Customize Blogger Contact Form! Part 1

12.06 0

Blogger Contact Forms

So most of you are aware of the recent gadget added to blogger widget directory and that is a small contact form with two input fields for name and Email and a text area for writing the message. We use a complex PHP Form for our contact page but blogger has made it extremely easy for you guys. Ever wondered how to customize this simple form into a professional looking contact form that may give a complete new boost to your overall blog look? Fortunately all MBT readers will be the first to learn this trick today. Plus you will also learn how to add this form anywhere on your blog! I had sometime today so I designed a custom version of this contact form by adding several new CSS3 effects and also added an additional button called "Clear" that will reset and erase the message for your visitors if incase they wish to rewrite a new message. Kindly view the Demo below:

Read more »

Automatic Numbering for Blogger Threaded Comments

12.30 0

Numbering blogger threaded commentsToday's tutorial will take blogger comment system one step more closer to wordpress commenting engine. I was amazed today when I discovered that W3 has already introduced an excellent way of automatically numbering lists in a HTML structure using pure CSS3 properties like counter-reset and counter-increment. Both these functionality provide a non-JavaScript approach to show comment counts for threaded and nested comments in blogger. MBT has contributed a lot in changing Blogger's Comment-body Styles for the past three years and this time we are introducing an interesting trick to add more spice to your blog comments. We are using a non-JavaScript approach unlike Wordpress's popular plugin called Greg's threaded Numbering

Read more »

Download counter : A Plugin for blogs!

12.11 0

Download counter for blogsThis is the first plugin of its kind created for websites which share downloadable resources. The plugin amazingly works with all major blogging platforms like wordpress and blogger blogs. It can even be used in static Sites or any CMS you may be using. This tool will count and display download stats whenever a visitor downloads a resource form your site. The data is stored at your firebase free account. Luckily we are amongst very few who have started developing tools using the newly introduced Firebase system that allows developers to create dynamic and data-driven tools without worrying about backend development. You do not need to worry about server code or managing databases, firebase does it all for free. All you need is to code some delicious scripts that does half the work.  This plugin is a custom alternative to Dstats download tracking service. Lets add this amazing tool to your blogger blogs!

Read more »

Exams Over! Celebrating Over 58,000 Readers

12.28 0

hurray Exams are over!Its tough being a final year B.E student and yet running blogs. Exams for some may sound horrible but it means a complete two months deadlock to my online activities. I just can't express how great I am feeling at this moment, talking to you after several weeks. It felt more like missing my great family and friends. Internet and technology waits for no one, during my absence I observed tremendous developments across major platforms from Blogger till social Media. I was shocked today when I saw the new layout of Google+ Profiles. Changes are going fast at Google side. Amazingly they have even integrated their comment Plugin with BlogSpot blogs. But what amazed me more was looking at STC Network's two months traffic Analytics and Ranking Details. Unfortunately Alexa for MBT has dropped from 4K to 6K but the good news is that readership has taken a whole new turn out. We are now a big community Alhamdulillah with a loyal readership of over 58,800 Readers  which is indeed a great news for all MBT readers and the team.

Read more »

Success Secrets of Pete Cashmore who started blogging at age 19

12.37 0


mashable and pete cashmoreFor any field that you might pick for yourself, has its own benchmarks of perfection and if you talk about blogging, Mashable is a winner here. No matter which niche you choose for your blog, there is no doubt that the best place to grab your hands on the latest news related to the online world and social media network is mashable. We have been advising our newbie readers to keep their eyes on sites like mashable as following sites which breaks headlines is something that always brings you not only a boost in readership, but also a quick revenue.


What I now believe after reading many success stories is that entrepreneurs are born that way actually, and a good example here is of Pete Cashmore, the mashable-man!

Read more »

Making Money with your New Blog - Monetizing Basics

12.27 0


Most bloggers will start off their venture in the hopes of earning big from their blogs. And not without reason either. Multitudes of people are earning a decent sum online. You can too. Earning money from your blog while sitting at home is like a dream for most, and yet, is a reality for many as well. It isn't difficult, it just needs some dedication, and the right guidance. In this post, well talk about monetizing your blog to make money online.


Read more »

11 Most Popular Female Bloggers of 2013!

11.27 0


Popular Female bloggers

Today when the biggest competitor of man out there in industry is woman, even the online earning medium too is equally availed by the powerful ladies who know how to cash their talent. It was once perceived that women lack in technical skills and it was somehow true too when the technical work was all limited to the real world, thanks to the online earning strategies, now the chances to make money online are equally available for both-man and woman.


When it comes to blogging, women are a sound contestant of the race and are generating good revenue with their blogs.


Being a female blogger myself, here are a few inspirational women who are known for their work. All data is latest for 2013 especially.  Have a look!


Read more »

10 Underestimated Ways of Making Money Online

12.29 0


underestimated ways to make moneyMaking money online and earning your livings via your laptop is becoming one of the most popular earning methods. Statistics have shown that there has been a significant increase in the number of people who are cashing their talent by utilizing the online platform, which for sure is a good replacement of any other real world job.


It is interesting to find that when you question people about all the possible online earning strategies available, all you come across is either blogging or freelancing. There are no doubts about the significance of the two; yet, it is to be remembered now that with the spreading awareness among the potential entrepreneurs, the two stated fields are becoming saturated and complicated. If you look forward to build your blog, you need reasons; pretty good to attract your potential readers, as it is, there are more than a billion sites that are running on the same niche as yours. Similarly, now that freelancing is turning into a giant monster, every next person is known as a freelancer which in turn has created a tough competitive freelance market.


Read more »

Basic SEO Tips for a Newly Launched Blog - Beginners Guide

12.11 0


SEO tips for beginners

Blogging is more than just about creating an online space for yourself and putting up content there. You have to be the best in order to compete with the best. But even becomes less important when it comes to optimizing your blog for search engines. After all, you want your great content to reach your potential readers, right? Otherwise, what's the point? This is the part where Search Engine Optimization (SEO) comes in. In this post, we'll take our beginner readers through the basic SEO process - things they should implement on their own blogs.


Read more »

5 most practiced Ways of building Active blog Readership

12.11 0


Building readership

So you've taken the first steps into blogging, and have set up a blog (and purchased a hosting or at least a domain hopefully)? Far from the job being done, we are only now getting started. Granted that choosing a blog topic, setting up a blog, buying a custom domain and hosting etc are some of the hardest parts. But that's as far as your decisions go. The next phase is to build upon those decisions. So now that you have started a blog, it is time to start building a readership!


Read more »

Arsip Blog