How to make the background image of the blog fill the entire screen

14.50 0
A constant question is how to make the background image of the blog always fill the entire screen regardless of the resolution of the monitor. And that is when we put a background image as measured by our monitor forgetting that there are actually monitors of all resolutions, very small and very large. So if we put an image according to our screen, there will be someone with a bigger monitor that surely will not see the whole picture or it will be repeated, and in this case, using very small monitors, the image will be seen incomplete.

blogger tricks, blogger tutorials, blogger blogspot

Here I will talk about two solutions for this, one is using CSS3, and another is using jQuery. With either of these two, we'll make the background image of the page to fill the entire screen regardless of the resolution of it.

CSS3


The first option is using CSS3, the advantage with this method is that we do not overload the blog with scripts, we use only the background-size property that is responsible for doing what we want.
The disadvantage is that this property is supported only by modern browsers, so in the case of Internet Explorer, it will only be seen for version 9 and above, in other browsers there shouldn't be any problem.
The method is very simple, just go to Template - Edit HTML, locate the background that is within body { and replace it with this:
background: url(Image URL) no-repeat center center fixed;
background-size: cover;
Note: to find the body { tag, click anywhere inside the code area then press the CTRL + F keys and paste it inside the search box. If you can't find it, remove the space between "body" and "{" then search again.

It would look something like this:
body {
background: url(URL of the image) no-repeat center center fixed;
background-size: cover;
margin:0;
}
Just put the URL of the image and that's it.

jQuery


With this method we will use jQuery with BackStretch plugin, the advantage is that it works in all browsers, including IE7 and above. And if you already use jQuery, you don't have to worry about the loading time of your blog, because the plugin is actually small.

To use this method in your blog, go to Template - Edit HTML and before </head> paste this script:
<script src='http://ajax.googleapis.com/ajax/libs/jquery/1.10.2/jquery.min.js' type='text/javascript'/>
<script type='text/javascript'>
//<![CDATA[
/*
* jQuery Backstretch
* Version 1.2.8
* http://srobbin.com/jquery-plugins/jquery-backstretch/
* Add a dynamically-resized background image to the page
* Copyright (c) 2012 Scott Robbin (srobbin.com)
* Licensed under the MIT license
* https://raw.github.com/srobbin/jquery-backstretch/master/LICENSE.txt
*/
;(function(a){a.backstretch=function(p,b,l){function s(){if(p){var b;0==c.length?c=a("<div />").attr("id","backstretch").css({left:0,top:0,position:m?"fixed":"absolute",overflow:"hidden",zIndex:-999999,margin:0,padding:0,height:"100%",width:"100%"}):c.find("img").addClass("deleteable");b=a("<img />").css({position:"absolute",display:"none",margin:0,padding:0,border:"none",zIndex:-999999,maxWidth:"none"}).bind("load",function(d){var b=a(this),e;b.css({width:"auto",height:"auto"});e=this.width||a(d.target).width();d=this.height||a(d.target).height();n=e/d;q();b.fadeIn(g.speed,function(){c.find(".deleteable").remove();"function"==typeof l&&l()})}).appendTo(c);0==a("body #backstretch").length&&(0===a(window).scrollTop()&&window.scrollTo(0,0),a("body").append(c));c.data("settings",g);b.attr("src",p);a(window).unbind("resize.backstretch").bind("resize.backstretch",function(){"onorientationchange"in window&&window.pageYOffset===0&&window.scrollTo(0,1);q()})}}function q(){try{j={left:0,top:0},rootWidth=h=o.width(),rootHeight=r?window.innerHeight:o.height(),f=h/n,f>=rootHeight?(k=(f-rootHeight)/2,g.centeredY&&(j.top="-"+k+"px")):(f=rootHeight,h=f*n,k=(h-rootWidth)/2,g.centeredX&&(j.left="-"+k+"px")),c.css({width:rootWidth,height:rootHeight}).find("img:not(.deleteable)").css({width:h,height:f}).css(j)}catch(a){}}var t={centeredX:!0,centeredY:!0,speed:0},c=a("#backstretch"),g=c.data("settings")||t;c.data("settings");var o,m,r,n,h,f,k,j;b&&"object"==typeof b&&a.extend(g,b);b&&"function"==typeof b&&(l=b);a(document).ready(function(){var b=window,d=navigator.userAgent,c=navigator.platform,e=d.match(/AppleWebKit\/([0-9]+)/),e=!!e&&e[1],f=d.match(/Fennec\/([0-9]+)/),f=!!f&&f[1],g=d.match(/Opera Mobi\/([0-9]+)/),h=!!g&&g[1],i=d.match(/MSIE ([0-9]+)/),i=!!i&&i[1];o=(m=!((-1<c.indexOf("iPhone")||-1<c.indexOf("iPad")||-1<c.indexOf("iPod"))&&e&&534>e||b.operamini&&"[object OperaMini]"==={}.toString.call(b.operamini)||g&&7458>h||-1<d.indexOf("Android")&&e&&533>e||f&&6>f||"palmGetResource"in window&&e&&534>e||-1<d.indexOf("MeeGo")&&-1<d.indexOf("NokiaBrowser/8.5.0")||i&&6>=i))?a(window):a(document);r=m&&window.innerHeight;s()});return this}})(jQuery);
//]]>
</script>
<script>
$.backstretch("URL of the image");
</script>

Put the URL of the image where indicated and ready.

As you can see both options are easy to apply, each with its pros and cons, but the result is the same, stretching the background image to fit the screen of any monitor regardless of the resolution of it.

Remember that in the case of jQuery method, you should verify that you are not using Mootools or Scriptaculous, and if you already have it, you will have to implement some changes in the script to make it compatible. And if you already use jQuery remember having only one version - the last one.

Vertical drop down menu with jQuery

12.18 0
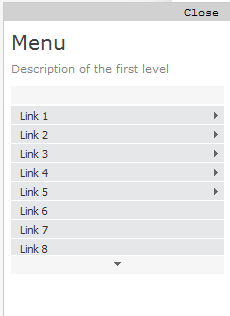
jGlideMenu is a vertical menu that can be dragged and dropped so that the reader can place it anywhere, and in addition, he can browse through the tabs in a very peculiar manner that comes with a sliding effect giving a sexy touch.

One of the advantages is that it can store a large number of links and can be removed anytime if we want.

vertical menu, menu for blogger

To understand this menu better and to see it in action, visit this demo blog. There we can drag the menu, navigate through its tabs or close.

To add this vertical menu on your blog, just follow these steps:

1) From your Blogger dashboard, go to Template > Edit HTML and before the </head> tag, add these scripts:
<script src='http://ajax.googleapis.com/ajax/libs/jquery/1.7.1/jquery.min.js' type='text/javascript'/>
<script src='http://ajax.googleapis.com/ajax/libs/jqueryui/1.7.1/jquery-ui.min.js' type='text/javascript'/>
<script src='http://helplogger.googlecode.com/svn/trunk/jQuery.jGlideMenu.min.js' type='text/javascript'/>

<script type='text/javascript'>
//<![CDATA[
$(document).ready(function(){
$('#jGlide_001').jGlideMenu({
tileSource : '.jGlide_001_tiles' ,
demoMode : false
}).show();

$('#switch').click(function(){$(this).jGlideMenuToggle();});
});
//]]>
</script>
2) Now paste before ]]></b:skin> these styles:
.jGM_box {
position: absolute; /* Change absolute with fixed if you want it to float */
top: 50px; /* Distance from above */
right: 760px; /* Distance from right */
width: 227px;
height: 317px;
background: #fff; /* Background color */
margin: 0;
padding: 0;
border: 1px solid #ccc; /* Border */
overflow: hidden;
}
.jGM_header {
position: absolute;
top: 0;
left: 0;
height: 18px;
width: 227px;
background: #d1d1d1; /* Background color for the up bar */
color: #fff;
text-align: right;
vertical-align: middle;
line-height: 18px;
cursor: move;
}
.jGM_header a {
margin-right: 12px;
text-decoration: none;
color: #000 !important;
cursor: pointer;
}
.jGM_wrapper {
position: absolute;
top: 19px;
left: 0;
width: 2270px;
height: 288px;
margin: 0;
padding: 0;
border: 0;
}
.jGM_tile {
position: absolute;
top: 0;
left: 7px;
width: 213px;
height: auto;
overflow: hidden;
margin: 0;
padding: 0;
border: 0;
display: block;
}
.jGM_cats {
width: 100%;
height: 64px;
overflow: hidden;
vertical-align: middle;
text-align: left;
}
.jGM_cats h4 {
font-family: Verdana,Arial,serif;
font-size: 1.8em;
margin: 0;
padding: 2px 0;
line-height: 1.8em;
color: #414141;
font-weight: normal;
}
.jGM_cats p {
font-family: Verdana,tahoma,arial;
font-size: 1em; /* Font size of the description */
margin: 0;
padding: 0;
line-height: 1.2em;
color: #858585; /* Description color */
font-weight: normal;
}
.jGM_pager {
height: 18px;
width: 213px;
line-height: 18px;
margin: 0;
border: 0;
padding: 0;
background: #f6f6f6;
text-align: center;
vertical-align: middle;
}
.jGM_pager a {
text-decoration: none;
font-weight: bold;
text-decoration: none;
display: block;
}
.jGM_pager a:hover { background: #d1d1d1; }
.jGM_pager img { border: 0; margin: 6px 0; }
.jGM_content {
width: 213px;
height: 150px;
margin: 1px 0;
padding: 0;
border: 0;
overflow: hidden;
}
.jGM_content a {
font-family: Tahoma,arial;
text-decoration: none;
color: #333 !important;
height: 18px;
width: 100%;
display: block;
line-height: 18px;
padding: 0 0 0 10px;
background-color: #e6e7e9;
margin: 1px 0;
}
.jGM_content a:hover {
color: #fff !important;
background-color: #4D4E67; /* Bar color on mouseover */
}
.jGM_more {
background-image: url(https://blogger.googleusercontent.com/img/b/R29vZ2xl/AVvXsEgtEMN65AxRd4VwLSsctoztxWnC49TARE1rEfvYLOZ0P0SYsCuzVBKptIjbAgj67YpvCq4FEIemHYRRa2iUwkia7Ah-zVU74cmzTOou_nKTEakjah1OJFROLqbOsjoc613JKGiJ2IedrUk/s1600/arrow.gif);
background-repeat: no-repeat;
background-position: 203px 50%;
}
.jGM_back {
position: absolute;
top: 255px;
right: 0;
height: 18px;
width: 52px;
background: #d1d1d1;
line-height: 18px;
vertical-align: middle;
text-align: center;
margin: 10px 0 0 0;
padding: 0;
border: 0;
z-index: 99;
}
.jGM_back a {
height: 100%;
width: 100%;
text-decoration: none;
color: #000 !important; /* Color of the "Back" link */
display: block;
}
.jGM_back a:hover {
color: #fff !important; /* Color of the "Back" link on mouseover */
background: #4D4E67;
}
.jGM_reset {
position: absolute;
top: 255px;
right: 62px;
height: 18px;
width: 52px;
background: #d1d1d1;
line-height: 18px;
vertical-align: middle;
text-align: center;
margin: 10px 0 0 0;
padding: 0;
border: 0;
z-index: 99;
}
.jGM_reset a {
height: 100%;
width: 100%;
text-decoration: none;
color: #000 !important; /* Color of the "Home" link */
display: block;
}
.jGM_reset a:hover {
color: #fff !important; /* Color of the "Home" link on mouseover */
background: #4D4E67;
}
3) Now go to Layout and paste the structure of the menu inside a HTML/Javascript gadget:
<div class="jGM_box" id="jGlide_001">

<!-- Here all the links of the first level -->
<ul id="tile_001" class="jGlide_001_tiles" title="Menu" alt="Description of the first level">
<li rel="tile_002">Link 1</li>
<li rel="tile_003">Link 2</li>
<li rel="tile_004">Link 3</li>
<li rel="tile_006">Link 4</li>
<li rel="tile_007">Link 5</li>
<li><a href="URL address">Link 6</a></li>
<li><a href="URL address">Link 7</a></li>
<li><a href="URL address">Link 8</a></li>
<li><a href="URL address">Link 9</a></li>
<li><a href="URL address">Link 10</a></li>
<li><a href="URL address">Link 11</a></li>
</ul>

<!-- Here all the links of the second level -->
<ul id="tile_002" class="jGlide_001_tiles" title="Menu" alt="Description of the second level">
<li rel="tile_005">Link 1.1</li>
<li><a href="URL address">Link 1.2</a></li>
<li><a href="URL address">Link 1.3</a></li>
<li><a href="URL address">Link 1.4</a></li>
</ul>

<ul id="tile_003" class="jGlide_001_tiles" title="Menu" alt="Description of the second level">
<li><a href="URL address">Link 2.1</a></li>
<li rel="tile_008">Link 2.2</li>
<li><a href="URL address">Link 2.3</a></li>
</ul>

<ul id="tile_004" class="jGlide_001_tiles" title="Menu" alt="Description of the second level">
<li><a href="URL address">Link 3.1</a></li>
<li><a href="URL address">Link 3.2</a></li>
<li><a href="URL address">Link 3.3</a></li>
</ul>


<ul id="tile_006" class="jGlide_001_tiles" title="Menu" alt="Description of the second level">
<li><a href="URL address">Link 4.1</a></li>
<li><a href="URL address">Link 4.2</a></li>
<li><a href="URL address">Link 4.3</a></li>
</ul>

<ul id="tile_007" class="jGlide_001_tiles" title="Menu" alt="Description of the second level">
<li><a href="URL address">Link 5.1</a></li>
<li><a href="URL address">Link 5.2</a></li>
</ul>


<!-- Here all the links of the third level -->
<ul id="tile_005" class="jGlide_001_tiles" title="Menu" alt="Description of the third level">
<li><a href="URL address">Link 1.1.1</a></li>
<li><a href="URL address">Link 1.1.2</a></li>
</ul>


<ul id="tile_008" class="jGlide_001_tiles" title="Menu" alt="Description of the third level">
<li><a href="URL address">Link 1.2.1</a></li>
<li><a href="URL address">Link 1.2.2</a></li>
</ul>

</div>
Add the URLs of the links and the names of the tabs and that's it.
If you want to add more links to the first level, then add another line like this:
<li><a href="URL address">Link 12</a></li>
If you want to add another level to the link, then the line should be like this:
<li rel="tile_0010">Link 5</li>
Then in the area of ​​the second or third level, add a piece like this:
<ul id="tile_0010" class="jGlide_001_tiles" title="Menu" alt="Description of the second level">
<li><a href="URL address">Link 5.1</a></li>
<li><a href="Url address">Link 5.2</a></li>
</ul>
Here you should keep something in mind, if you look closely the link takes the REL attribute which must be the same as the ID we put on the second level, these IDs should not repeat and always be unique.
Yes, it sounds complicated, but once you understand the concept, you'll see that is actually pretty simple.
In the area of ​​the styles, there are the parts that can be customized. If you want the menu to be static, let's say you want to add it in the sidebar, then delete the first code of the script that is in italics. And in the CSS styles, remove this part:
position: absolute; /* Change absolute with fixed if you want it to float */
top: 50px; /* Distance above */
right: 760px; /* Distance to the right */
When there are many links then, there will be showing some arrows, so when you mouseover them, it will show the rest of the links either up or down.

Throughout the menu structure we can change the Menu name and the descriptions as well.

As this menu is made with JQuery, it is recommended to verify to have only one version of it.

How to embed a youtube playlist on your blogger blog

08.44 0
In this tutorial you will see how to create a YouTube video gallery using jQuery and add the Youtube playlist to your Blogger blog. Inside this gallery/playlist, you can add your favorite youtube videos or any video that you want to share with your visitors. Because of its default dimensions (width of 765px), it is recommended to add it just below the blog header, however, you can edit CSS code to fit anywhere you want to add it.

youtube playlist for blogger


To add this video slider/youtube playlist to your blog, please follow these steps below:

Step 1. From your blogger dashboard, go to Template > Edit HTML and click anywhere inside the code area to open the Blogger search box by pressing the CTRL + F keys.


Step 2. Type or paste the </head> tag inside the search box and hit Enter to find it.
Just above this tag, add the following scripts:

<script src='http://ajax.googleapis.com/ajax/libs/jquery/1.8.2/jquery.min.js' type='text/javascript'/>
<script>
//<![CDATA[
/*hoverscroll v.0.2.4*/
(function($) {
$.fn.hoverscroll = function(params) {
if (!params) { params = {}; }
params = $.extend({}, $.fn.hoverscroll.params, params);
this.each(function() {
var $this = $(this);
if (params.debug) {$.log('[HoverScroll] Trying to create hoverscroll on element ' + this.tagName + '#' + this.id);}
if (params.fixedArrows) {
$this.wrap('<div class="fixed-listcontainer"></div>')
}
else {
$this.wrap('<div class="listcontainer"></div>');
}

$this.addClass('list');
var listctnr = $this.parent();
listctnr.wrap('<div class="ui-widget-content hoverscroll' +
(params.rtl && !params.vertical ? " rtl" : "") + '"></div>');
//listctnr.wrap('<div class="hoverscroll"></div>');

var ctnr = listctnr.parent();

var leftArrow, rightArrow, topArrow, bottomArrow;
if (params.arrows) {
if (!params.vertical) {
if (params.fixedArrows) {
leftArrow = '<div class="fixed-arrow left"></div>';
rightArrow = '<div class="fixed-arrow right"></div>';

listctnr.before(leftArrow).after(rightArrow);
}
else {
leftArrow = '<div class="arrow left"></div>';
rightArrow = '<div class="arrow right"></div>';

listctnr.append(leftArrow).append(rightArrow);
}
}
else {
if (params.fixedArrows) {
topArrow = '<div class="fixed-arrow top"></div>';
bottomArrow = '<div class="fixed-arrow bottom"></div>';

listctnr.before(topArrow).after(bottomArrow);
}
else {
topArrow = '<div class="arrow top"></div>';
bottomArrow = '<div class="arrow bottom"></div>';

listctnr.append(topArrow).append(bottomArrow);
}
}
}
ctnr.width(params.width).height(params.height);

if (params.arrows && params.fixedArrows) {
if (params.vertical) {
topArrow = listctnr.prev();
bottomArrow = listctnr.next();

listctnr.width(params.width)
.height(params.height - (topArrow.height() + bottomArrow.height()));
}
else {
leftArrow = listctnr.prev();
rightArrow = listctnr.next();

listctnr.height(params.height)
.width(params.width - (leftArrow.width() + rightArrow.width()));
}
}
else {
listctnr.width(params.width).height(params.height);
}

var size = 0;

if (!params.vertical) {
ctnr.addClass('horizontal');
$this.children().each(function() {
$(this).addClass('item');

if ($(this).outerWidth) {
size += $(this).outerWidth(true);
}
else {
size += $(this).width() + parseInt($(this).css('padding-left')) + parseInt($(this).css('padding-right'))
+ parseInt($(this).css('margin-left')) + parseInt($(this).css('margin-right'));
}
});
$this.width(size);

if (params.debug) {
$.log('[HoverScroll] Computed content width : ' + size + 'px');
}
if (ctnr.outerWidth) {
size = ctnr.outerWidth();
}
else {
size = ctnr.width() + parseInt(ctnr.css('padding-left')) + parseInt(ctnr.css('padding-right'))
+ parseInt(ctnr.css('margin-left')) + parseInt(ctnr.css('margin-right'));
}

if (params.debug) {
$.log('[HoverScroll] Computed container width : ' + size + 'px');
}
}
else {
ctnr.addClass('vertical');
$this.children().each(function() {
$(this).addClass('item')

if ($(this).outerHeight) {
size += $(this).outerHeight(true);
}
else {
size += $(this).height() + parseInt($(this).css('padding-top')) + parseInt($(this).css('padding-bottom'))
+ parseInt($(this).css('margin-bottom')) + parseInt($(this).css('margin-bottom'));
}
});
$this.height(size);

if (params.debug) {
$.log('[HoverScroll] Computed content height : ' + size + 'px');
}
if (ctnr.outerHeight) {
size = ctnr.outerHeight();
}
else {
size = ctnr.height() + parseInt(ctnr.css('padding-top')) + parseInt(ctnr.css('padding-bottom'))
+ parseInt(ctnr.css('margin-top')) + parseInt(ctnr.css('margin-bottom'));
}

if (params.debug) {
$.log('[HoverScroll] Computed container height : ' + size + 'px');
}
}
var zone = {
1: {action: 'move', from: 0, to: 0.06 * size, direction: -1 , speed: 16},
2: {action: 'move', from: 0.06 * size, to: 0.15 * size, direction: -1 , speed: 8},
3: {action: 'move', from: 0.15 * size, to: 0.25 * size, direction: -1 , speed: 4},
4: {action: 'move', from: 0.25 * size, to: 0.4 * size, direction: -1 , speed: 2},
5: {action: 'stop', from: 0.4 * size, to: 0.6 * size},
6: {action: 'move', from: 0.6 * size, to: 0.75 * size, direction: 1 , speed: 2},
7: {action: 'move', from: 0.75 * size, to: 0.85 * size, direction: 1 , speed: 4},
8: {action: 'move', from: 0.85 * size, to: 0.94 * size, direction: 1 , speed: 8},
9: {action: 'move', from: 0.94 * size, to: size, direction: 1 , speed: 16}
}

ctnr[0].isChanging = false;
ctnr[0].direction = 0;
ctnr[0].speed = 1;
function checkMouse(x, y) {
x = x - ctnr.offset().left;
y = y - ctnr.offset().top;

var pos;
if (!params.vertical) {pos = x;}
else {pos = y;}

for (i in zone) {
if (pos >= zone[i].from && pos < zone[i].to) {
if (zone[i].action == 'move') {startMoving(zone[i].direction, zone[i].speed);}
else {stopMoving();}
}
}
}

function setArrowOpacity() {
if (!params.arrows || params.fixedArrows) {return;}

var maxScroll;
var scroll;

if (!params.vertical) {
maxScroll = listctnr[0].scrollWidth - listctnr.width();
scroll = listctnr[0].scrollLeft;
}
else {
maxScroll = listctnr[0].scrollHeight - listctnr.height();
scroll = listctnr[0].scrollTop;
}
var limit = params.arrowsOpacity;
var opacity = (scroll / maxScroll) * limit;

if (opacity > limit) { opacity = limit; }
if (isNaN(opacity)) { opacity = 0; }

var done = false;
if (opacity <= 0) {
$('div.arrow.left, div.arrow.top', ctnr).hide();
if(maxScroll > 0) {
$('div.arrow.right, div.arrow.bottom', ctnr).show().css('opacity', limit);
}
done = true;
}
if (opacity >= limit || maxScroll <= 0) {
$('div.arrow.right, div.arrow.bottom', ctnr).hide();
done = true;
}

if (!done) {
$('div.arrow.left, div.arrow.top', ctnr).show().css('opacity', opacity);
$('div.arrow.right, div.arrow.bottom', ctnr).show().css('opacity', (limit - opacity));
}
}

function startMoving(direction, speed) {
if (ctnr[0].direction != direction) {
if (params.debug) {
$.log('[HoverScroll] Starting to move. direction: ' + direction + ', speed: ' + speed);
}

stopMoving();
ctnr[0].direction = direction;
ctnr[0].isChanging = true;
move();
}
if (ctnr[0].speed != speed) {
if (params.debug) {
$.log('[HoverScroll] Changed speed: ' + speed);
}

ctnr[0].speed = speed;
}
}

function stopMoving() {
if (ctnr[0].isChanging) {
if (params.debug) {
$.log('[HoverScroll] Stoped moving');
}

ctnr[0].isChanging = false;
ctnr[0].direction = 0;
ctnr[0].speed = 1;
clearTimeout(ctnr[0].timer);
}
}

function move() {
if (ctnr[0].isChanging == false) {return;}

setArrowOpacity();

var scrollSide;
if (!params.vertical) {scrollSide = 'scrollLeft';}
else {scrollSide = 'scrollTop';}

listctnr[0][scrollSide] += ctnr[0].direction * ctnr[0].speed;
ctnr[0].timer = setTimeout(function() {move();}, 50);
}

if (params.rtl && !params.vertical) {
listctnr[0].scrollLeft = listctnr[0].scrollWidth - listctnr.width();
}

ctnr
.mousemove(function(e) {checkMouse(e.pageX, e.pageY);})
.bind('mouseleave', function() {stopMoving();});

this.startMoving = startMoving;
this.stopMoving = stopMoving;

if (params.arrows && !params.fixedArrows) {
// Initialise arrow opacity
setArrowOpacity();
}
else {
// Hide arrows
$('.arrowleft, .arrowright, .arrowtop, .arrowbottom', ctnr).hide();
}
});

return this;
};

if (!$.fn.offset) {
$.fn.offset = function() {
this.left = this.top = 0;

if (this[0] && this[0].offsetParent) {
var obj = this[0];
do {
this.left += obj.offsetLeft;
this.top += obj.offsetTop;
} while (obj = obj.offsetParent);
}

return this;
}
}

$.fn.hoverscroll.params = {
vertical: false,
width: 400,
height: 50,
arrows: true,
arrowsOpacity: 0.7,
fixedArrows: false,
rtl: false,
debug: false
};
$.log = function() {
try {console.log.apply(console, arguments);}
catch (e) {
try {opera.postError.apply(opera, arguments);}
catch (e) {}
}
};
})(jQuery);

$(function(){
$("#videoslider-tabs a").click(function(){
var container = $("#videoslider-content");
container.html("<img src='https://blogger.googleusercontent.com/img/b/R29vZ2xl/AVvXsEhCpXXhO_vObrjSRlDIR5BDgbSUgZK1dAxttvb8qR-UbzUgPiYazL256l6GWDUexVMmMEnFf1rADuho8-Cbk-ydaeBDimhB8IXilf8UoXnAOMt5OU8d6MrZr5jmQoUrfMLxYOnPd4ASL6Ed/s1600/loading.png' class='loading-vid' />");
var id = $(this).attr("href").slice(1);
loadvideo(id);
return false;
});
$("#videoslider-tabs").hoverscroll({vertical:true,width:300,height:330,arrows:false});
$("#videoslider-tabs li").hover(function(){$(this).addClass("hover");},function(){$(this).removeClass("hover");});
loadvideo();
});

function loadvideo (hash){if(hash){hash = hash.slice(3);$("#videoslider-content").html(video[hash]);$("#videoslider-tabs li").removeClass("actVid");$("#videoslider-tabs a[href=#vid"+hash+"]").parent().addClass("actVid");}else{$("#videoslider-content").html(video[1]);$("#videoslider-tabs li").removeClass("actVid");$("#videoslider-tabs a[href=#vid1]").parent().addClass("actVid");}}
//]]>
</script>

Step 3. Now let's add the CSS code. Just above the same </head> tag, add this code:
<style>
#videoslider {
background:#F6F6F6; /* Background color */
clear:both;
margin:0 auto;
padding:5px;
width:735px;
border-radius: 5px;
border: 1px solid #C1C1C1;
-moz-background-clip: padding;
-webkit-background-clip: padding-box;
background-clip: padding-box;
}
#videoslider, #videoslider-content, #videoslider-tabs {
height:340px;
}
#videoslider-content {
color:#fff;
float:left;
text-align:center;
width:430px;
z-index:1;
}
.loading-vid {
display:block;
margin:165px auto 0;
}
#videoslider-tabs {
float:right;
width:240px;
margin:0;
}
#videoslider-tabs li {
background-color:#F6F6F6;
border: 1px solid #C1C1C1;
float:left;
height:60px;
padding:5px;
width:240px;
list-style:none;
overflow: hidden;
}
#videoslider-tabs li a {
padding:0 !important;
border:0 !important;
}
#videoslider-tabs li.hover {
background-color:#EBEBEB;
}
#videoslider-tabs li.actVid {
background:#555;
}
#videoslider-tabs li img.thumb-vid {
background-color:#EEEEEE;
float:left;
height:52px;
margin:0 8px 0 0;
padding:5px;
width:52px;
}
#videoslider-tabs li span.vidTit {
display:block;
color:#128EC9; /* Titles color */
font-size:12px; /* Titles font size */
font-weight:bold;
text-decoration:none;
}
#videoslider-tabs li .vidDesc {
display:block;
color:#222222; /* Color of the description */
font-size:11px; /* Font size of the description */
font-weight:bold;
text-decoration:none;
}
#videoslider-tabs a {
text-decoration:none;
}
#videoslider-tabs li.actVid .vidDesc {
color:#fff;
}
#videoslider-tabs li span.vidTit .actVid {
color:#fff; /* Titles color */
}
.ui-widget-content{
float:right;
overflow-y: scroll;
overflow-x: hidden;
}
.tabs-outer {
background-image: none !important;
}
#videoslider-tabs li a:hover {
background: none !important;
}</style>
Step 4. Click on the Save Template button

To make this youtube playlist work we need to add the HTML structure of it:

Step 5. Go to Layout or Pages or anywhere you want to add it and add the following code inside the HTML area (if you want to add it as a widget, paste the code inside a HTML/Javascript gadget by clicking on Add a gadget link within the Layout/Page Elements section):
<script>
var video = [];
video[1] = '<iframe width="460" height="345" src="http://www.youtube.com/embed/video_ID_1" frameborder="0" allowfullscreen></iframe>';
video[2] = '<iframe width="460" height="345" src="http://www.youtube.com/embed/video_ID_2" frameborder="0" allowfullscreen></iframe>';
video[3] = '<iframe width="460" height="345" src="http://www.youtube.com/embed/video_ID_3" frameborder="0" allowfullscreen></iframe>';
video[4] = '<iframe width="460" height="345" src="http://www.youtube.com/embed/video_ID_4" frameborder="0" allowfullscreen></iframe>';
video[5] = '<iframe width="460" height="345" src="http://www.youtube.com/embed/video_ID_5" frameborder="0" allowfullscreen></iframe>';
</script>
<div id="videoslider">
<div id="videoslider-content"></div>
<ul id="videoslider-tabs">
<li><a href="#vid1"><img src="//i2.ytimg.com/vi/video_ID_1/default.jpg" class="thumb-vid" /><span class="vidTit">Video Name</span><span class="vidDesc">Video Description</span></a></li>

<li><a href="#vid2"><img src="//i2.ytimg.com/vi/video_ID_2/default.jpg" class="thumb-vid" /><span class="vidTit">Video Name</span><span class="vidDesc">Video Description</span></a></li>

<li><a href="#vid3"><img src="//i2.ytimg.com/vi/video_ID_3/default.jpg" class="thumb-vid" /><span class="vidTit">Video Name</span><span class="vidDesc">Video Description</span></a></li>

<li><a href="#vid4"><img src="//i2.ytimg.com/vi/video_ID_4/default.jpg" class="thumb-vid" /><span class="vidTit">Video Name</span><span class="vidDesc">Video Description</span></a></li>

<li><a href="#vid5"><img src="//i2.ytimg.com/vi/video_ID_5/default.jpg" class="thumb-vid" /><span class="vidTit">Video Name</span><span class="vidDesc">Video Description</span></a></li>
</ul>
</div>

Add the IDs of your videos to where it says video_ID_..., titles (Video Name) and a brief description (Description). To get the ID of a video, open the video on YouTube and look at the address bar - you need only the last characters after "v="


Note that each video ID should be added two times, the ones in red are for the video and the ones in orange are for the tabs thumbnail.

To add more videos, add two lines like the ones in bold above and then change the video[] and #vid... number. If you decided to add it inside a post or page, please make sure that you don't switch back to the Compose tab and publish your post while you're still on the HTML tab, otherwise the #vid location will be replaced with some other odd Blogger URLs.

Latest Study Reveals How Effective Facebook Hashtags Are (And Aren't)

11.11 0

EdgeRank Checker study about hashtags


To Twitter and Google Plus users, hashtags are nothing new. They are known to have been useful marketing tools for many businesses. But Facebook is another matter. Facebook introduced the fancy hashtags back in June this year, a bit late in the offering. Too late perhaps, as one latest study suggests that Facebook hashtags might not be doing you much good. In fact, they might not be doing any good at all! The Facebook analytics service, EdgeRank Checker's findings conclude that posts with hashtags don't have an edge at all over posts without them!

Read more »

What Are Facebook Hashtags and How To Effectively Use Them?

11.11 0


Everything about Facebook Hashtags


If you have used Twitter, then you might be familiar with #hashtags. A #hashtag is basically a word or a phrase which is prefixed with a #. These #hashtags basically turn topics and phrases into click-able links. Twitter, Tout, identi.ca, Tumblr, Instagram, Flickr, Google+, all support hashtags. Recently Facebook also added the support for hashtags, and naturally, a lot of the users out there don't know what to do with them. The concept basically carries over from Twitter, so Twitter users who use Facebook know what they are. But for someone who has never used Twitter in their life, the hashtag can be an enigmatically cool-looking phrase which apparently is becoming 'cooler' and trendier by the day. Here's all you need to know about Facebook Hashtags.


Read more »

Now Check Better Site Backlink Data in Webmaster Tools

11.11 0


Better Backlink Data for Webmasters

Google Webmaster Tools is something that nearly every webmaster and blogger has been using for years. You're not a webmaster unless you know your way around Google Webmaster Tools, because it offers so many features, and shows so much data which I simply cannot imagine not having. One very important feature is the backlink profile for your website, with which you can find and repair your broken links for better user experience and SEO. Talking of which, Google has just improved this feature, which now provides enhanced backlink data - better than it did before.

Read more »

Recover Your blog's Lost Traffic Due to Recent Google Outage

11.00 0

recover lost trafficThe reason why we delayed this post was that we were actually experimenting on what actually caused a Global drop in traffic and why isn't Google responding on this biggest traffic Tsunami ever. I remember that from July 17th to August 17th MattCutts was on a 30 days self-Challenge of not reading news or using social media. I guess that challenge has already ended but is MattCutts even aware of the recent Google Outage that took place on August 16th, when he was on this "No Social Media, No News" challenge? :> We were not able to find a single piece of information on what exactly happened on August 16th and therefore were forced to do our own experimentation which at least improved our traffic by 10% and we are further waiting for more productive results. The tips below are optimization techniques for both Blogger and Wordpress Platforms. Applying them is indeed the easiest and quickest job.

Read more »

Automatically share your blog posts to Google+ on Blogger!

11.11 0


Share blog posts on Google Plus

Sharing the content you create online on your blog with your friends, family and followers is a great way to get the word going. And since word-of-mouth marketing is often considered to be the best marketing tactic, your content gets a lot more out-reach when your followers in-turn share your content on social media. It's crucial for growing your blog's audience and engagement. But often times, one does not have the time to manually open social media pages, and share a post. Keeping this in view, Google has added a new feature to blogger, which allows bloggers to automatically share their blog posts on Google Plus.

Read more »

How To Serve Responsive Images On Your Site?

11.11 0


Responsive Web Design techniques


Responsive Web Design (RWD) has now become one of the the most important web design techniques nowadays, and it provide the cornerstone for modern mobile web development. Implementing a few RWD techniques to your blog can give it the edge it needed, nay deserved, to entice its mobile users to visit more often. So while we're on the subject of implementing RWD techniques, let's talk a bit about serving truly responsive images, because there are a couple issues every webmaster faces when dealing with images, responsively speaking.

Read more »

How To Check For Duplicate Content Copied From Your Site?

11.15 0

Duplicate Content is bad!


As a blogger or content creator, or even a SEO, you always run the risk of getting your online content ripped off and copied. It's a risk because even though search engines might be getting smarter at detecting the original source of some duplicate content, it isn't always easy. And there's no guarantee that the original source will be determined every time, and the duplicated content penalized. Not only do you end up competing against your 'own content' so to speak, search engines also try to eliminate duplicate copies of some content, which could result in your content's elimination altogether. Here are a few ways you can check for multiple copies of your content elsewhere on the internet.

Read more »

Up to 90% Massive Drop in Google Search Traffic Worldwide [Case Study]

11.00 0

Case Study on recent Google OutageLooks like Google is acting Cowboy again! Forums are getting crowded daily with questions related to a massive Organic Search traffic drop on sites world wide. Almost all sites are effected be it entertainment based, IT orientated, ecommerce or blogs ran on Wordpress and Blogger. All www domains have been seriously effected by Google with a 50%-90% Cruel Traffic penalty without any prior notice or announcement. Matt Cutts blog and his twitter profile are both deserted and there appears to be no updates on what exactly is happening. Webmasters around the world have been terribly hit by this biggest algorithmic change far bigger than Panda or Penguin. The interesting part to note is, Google blogs, forums and the company employees wont utter a word on what just happened on August 16 and August 21?  

Around half of our clients complained recently about a major drop in their traffic. Since we offer SEO consultancy, its our job to keep these sites well optimized. I was shocked with the figures I received from their Analytics reports. Far bigger surprise was when we noticed all blogs of STC Network being terribly effected with a tremendous loss in traffic for the past few weeks starting from August 16th. Based on the free available tools we have online, following are some reports presented as a brief Case Study that would prove that a major algorithmic change has surely occurred on Google's side which the company is neglecting to answer so far.

Read more »

Making a gadget visible only to the blog administrator

09.12 0
And the post title says it all. There are gadgets that sometimes we want to be visible only to us and not to our blog readers, perhaps a Survey already ended that we want to keep, a counter, or any gadget that while we customize, we don't want anyone else to see until the final result is ready.
blogger widgets, blogger tutorials
 The procedure is simple, we just have to add two lines to our gadget that we want to hide.

First thing to do is to go to Template > Edit HTML and then search for the gadget's code we want to hide. It will be easier using the CTRL + F keys and locating the name of the gadget/widget.

For example, in a HTML/Javascript gadget, we will see a code like this:
<b:widget id='HTML1' locked='false' title='' type='HTML'>
<b:includable id='main'>
<span class='item-control blog-admin'>
<!-- only display title if it's non-empty -->
<b:if cond='data:title != &quot;&quot;'>
<h2 class='title'><data:title/></h2>
</b:if>
<div class='widget-content'>
<data:content/>
</div>

<b:include name='quickedit'/>
</span>
</b:includable>
</b:widget>
All you have to do is add the parts in red and ready. If you close the session go to your blog you'll not be able to view the gadget that you have hidden, but as soon as you sign in you will see that it is visible to you.
Not all gadgets have the same structure like in my example, but it will be easier to guide you, just place the first code in red just after <b:includable id='main'>

And the second red code just before </b:includable>
Note: to look inside the widget's code, click on the sideways arrow next to the widget's id.

And with that the gadget will be hidden for readers except you.