Now Access the Webmasters Academy in Over 40 Languages

12.27 0


Webmaster Academy


When you really want to achieve something, then the limit of your knowledge no longer becomes a hindrance. This has held true for a lot of webmasters, who are self-taught, and rely on their ambition to learn and implement new things that they consider useful. But whether you are a beginner, or a seasoned veteran, there's always room for some improvement - for learning something new. That is why Google set up a Webmaster's Academy to teach everyone from a total newbie to an advanced user on how to better understand Google, and how to perform better in search results. This Academy was set up last year, but was only available in the English language up until now. Now though, thanks to Google, the Webmaster Academy has gone international, with support for more than 40 languages!


Read more »

Related Posts Widget with Thumbnails and Summary for Blogger

08.03 0
There are several tutorials quite old in which I have shown different methods for displaying related posts in Blogger [1] [2] but in this tutorial, you will learn how to implement a really awesome Related Posts widget with Thumbnails and Posts Snippets that will appear in the footer of all your blog posts. If you want to get an idea of how it looks like, please visit this demo blog.

Now let's see how to add the related posts widget with thumbnails and summaries in a Blogger template:

Adding Related Posts Widget with Summaries to Blogger
related posts widget with thumbnails and summaries

Step 1. From your Blogger Dashboard, go to Template and click on Edit HTML


Step 2. Click anywhere inside the code area and then press CTRL + F to open the Blogger search box


Step 3. Type or paste this tag inside the search box and hit enter to find it:
</head>
After you found it, paste this script just above it:
<script type='text/javascript'>
//<![CDATA[
var relatedTitles = new Array();
var relatedUrls = new Array();
var relatedpSummary = new Array();
var relatedThumb = new Array();
var relatedTitlesNum = 0;
var relatedPostsNum = 4; // number of entries to be shown
var relatedmaxnum = 75; // the number of characters of summary
var relatednoimage = "https://blogger.googleusercontent.com/img/b/R29vZ2xl/AVvXsEjfWLLvXsNzCjP8eqxN97NiDShOu3Zd_KjGc01Bk8qPtzX8wZhhIOYk0BigaiGEy-Xyrn7McgVYpZNpu4SKXFy3OOJt0_1uDx4nB5F941E-wY5WdAQBEU14ZMrEBrtIWgHWkL2lAbS27Bpo/s1600/no_image.jpg"; // default picture for entries with no image
//]]>
</script>
<script src="http://helplogger.googlecode.com/svn/trunk/related-posts-with-thumbs-and-summaries.js" />
Note:  
    - To change the number of posts that are being displayed, modify the value in red (4)
    - To change the number of characters to be shown in posts summary, modify the value in green (75)
    - To change the default pic for posts with no images, add your URL instead of the one marked in blue

      Now that we added the script, we will need to add the style. Paste the following code above the same </head> tag:
      <style>
      .relatedsumposts {
          float: left;
          padding: 0px 10px;
          overflow: hidden;
          text-align: center;
        /* width and height of the related posts area */
          width: 120px;
          height: 200px;
          border-right: 1px solid #E5E5E5;
          display: inline-block;
      }

      .relatedsumposts:hover {
          background-color: #F7F7F7;
      }

      .relatedsumposts img:hover {
          -webkit-transform: rotate(360deg);
          -moz-transform: rotate(360deg);
          -o-transform: rotate(360deg);
      }

      .relatedsumposts a {
        /* link properties */
          color: #linkcolor;
          display: inline;
          font-size: 10px;
          line-height: 1;
      }

      .relatedsumposts img {
        /* thumbnail properties */
          margin-top: 2px;
          height: 82px;
          padding: 5px;
          width: 82px;
          border: 1px solid #fff;
          -webkit-border-radius: 100px;
          -moz-border-radius: 100px;
          border-radius: 100px;

          -webkit-box-shadow: 0 1px 2px rgba(0, 0, 0, .4);
          -moz-box-shadow: 0 1px 2px rgba(0, 0, 0, .4);
          box-shadow: 0 1px 2px rgba(0, 0, 0, .4);
          -webkit-transition-duration: 0.8s;
          -moz-transition-duration: 0.8s;
          -o-transition-duration: 0.8s;
          transition-duration: 0.8s;
          -webkit-transition-property: -webkit-transform;
          -moz-transition-property: -moz-transform;
          -o-transition-property: -o-transform;
          transition-property: transform;
          overflow: hidden;
      }

      .relatedsumposts h6 {
        /* title properties */
          display: table-cell;
          height: 3em;
          margin: 5px 0 0;
          overflow: hidden;
          padding-bottom: 2px;
          vertical-align: middle;
          width: 130px;
      }

      .relatedsumposts p {
        /* summary properties */
          border-top: 1px solid #E5E5E5;
          border-bottom: 1px solid #E5E5E5;
          color: #summarycolor;
          font-size: 10px;
          height: 4em;
          line-height: 1;
          margin: 5px 0 0;
          overflow: hidden;
          padding: 5px 0 15px 0;
          text-align: left;
      }

      #relatedpostssum {
          background: #F3F3F3;
          height: 200px; /* related posts container */
          padding: 5px;
          width: 100%;
      }

      .relatedpoststitle {
          font-size: 19px;
          font-weight: bold;
          border-top: 3px solid #FB8227;
          color: #777;
          display: inline-block;
          padding: 5px 10px;
          width: 190px;
          float: left;
          margin: 0px -200px 0px 20px;
          transform: rotate(90deg);
          transform-origin: left top 0;
          -ms-transform: rotate(90deg);
          -ms-transform-origin:left top 0;
          -webkit-transform: rotate(90deg);
          -webkit-transform-origin:left top 0; 
         font-family: Gill Sans / Gill Sans MT, sans-serif;
      }
      </style>
      Note:  
        - Modify the values in red to adjust the width (120) and height (210) of the widget area
        - Replace #linkcolor with the hex value of your color to change the color of post titles
        - If you want to change the size of thumbnails, modify the values marked in violet (82)
        - To determine the border roundness, modify the values in orange (100)
        - To change the color of the post snippet, change #summarycolor with color hex value
        - In case you add more that 5 related posts, change the container height 200px to 400px

        2nd Note: If you have a dark background, you may want to add this style instead (see the screenshot):

        related posts widget with thumbnails and summaries
         <style>
        .relatedsumposts {
            float: left;
            padding: 0px 10px;
            overflow: hidden;
            text-align: center;
          /* width and height of the related posts area */
            width: 120px;
            height: 200px;
            border-right: 1px solid #0A0A0A;
            display: inline-block;
        }

        .relatedsumposts:hover {
            background-color: #0A0A0A;
        }

        .relatedsumposts img:hover {
            -webkit-transform: rotate(360deg);
            -moz-transform: rotate(360deg);
            -o-transform: rotate(360deg);
        }

        .relatedsumposts a {
          /* link properties */
            color: #linkcolor;
            display: inline;
            font-size: 10px;
            line-height: 1;
        }

        .relatedsumposts img {
          /* thumbnail properties */
            margin-top: 2px;
            height: 82px;
            padding: 5px;
            width: 82px;
            border: 1px solid #000;
        background:#282828;
            -webkit-border-radius: 100px;
            -moz-border-radius: 100px;
            border-radius: 100px;

            -webkit-box-shadow: 0 1px 2px rgba(0, 0, 0, .4);
            -moz-box-shadow: 0 1px 2px rgba(0, 0, 0, .4);
            box-shadow: 0 1px 2px rgba(0, 0, 0, .4);
            -webkit-transition-duration: 0.8s;
            -moz-transition-duration: 0.8s;
            -o-transition-duration: 0.8s;
            transition-duration: 0.8s;
            -webkit-transition-property: -webkit-transform;
            -moz-transition-property: -moz-transform;
            -o-transition-property: -o-transform;
            transition-property: transform;
            overflow: hidden;
        }

        .relatedsumposts h6 {
          /* title properties */
            display: table-cell;
            height: 3em;
            margin: 5px 0 0;
            overflow: hidden;
            padding-bottom: 2px;
            vertical-align: middle;
            width: 130px;
        }

        .relatedsumposts p {
          /* summary properties */
            border-top: 1px solid #0A0A0A;
            border-bottom: 1px solid #0A0A0A;
            color: #summarycolor;
            font-size: 10px;
            height: 4em;
            line-height: 1;
            margin: 5px 0 0;
            overflow: hidden;
            padding: 5px 0 15px 0;
            text-align: left;
        }

        #relatedpostssum {
            background: #121212;
            height: 200px; /* related posts container */
            padding: 5px;
            width: 100%;
        }

        .relatedpoststitle {
            font-size: 19px;
            font-weight: bold;
            border-top: 3px solid #FB8227;
            color: #ccc;
            display: inline-block;
            padding: 5px 10px;
            width: 190px;
            float: left;
            margin: 0px -200px 0px 20px;
            transform: rotate(90deg);
            transform-origin: left top 0;
            -ms-transform: rotate(90deg);
            -ms-transform-origin:left top 0;
            -webkit-transform: rotate(90deg);
            -webkit-transform-origin:left top 0;
           font-family: Gill Sans / Gill Sans MT, sans-serif;
        }
        </style>
        Step 4. Next, search (CTRL + F) for the following code snippet:
        <a expr:href='data:label.url' rel='tag'><data:label.name/></a><b:if cond='data:label.isLast != &quot;true&quot;'>,</b:if>
        And after you found it, add this script just below it:
        <b:if cond='data:blog.pageType == &quot;item&quot;'>
            <script expr:src='&quot;/feeds/posts/default/-/&quot; + data:label.name + &quot;?alt=json-in-script&amp;callback=readpostlabels&amp;max-results=50&quot;' type='text/javascript'/>
          </b:if>
        The entire fragment should look like this:
                  <b:loop values='data:post.labels' var='label'>
                    <a expr:href='data:label.url' rel='tag'><data:label.name/></a><b:if cond='data:label.isLast != &quot;true&quot;'>,</b:if>
        <b:if cond='data:blog.pageType == &quot;item&quot;'>
            <script expr:src='&quot;/feeds/posts/default/-/&quot; + data:label.name + &quot;?alt=json-in-script&amp;callback=readpostlabels&amp;max-results=50&quot;' type='text/javascript'/>
          </b:if>

                  </b:loop>
        Step 5. Finally, find this fragment of code:
        </b:includable>
        <b:includable id='postQuickEdit' var='post'>
        Note: search only the line in red and after you find it, you should see the </b:includable> tag above it

        ! Click on the sideways arrow to expand the code, then scroll down until you reach to the highlighted line !

        Just ABOVE the </b:includable> tag, add the following code:
        <b:if cond='data:blog.pageType == &quot;item&quot;'>
          <div class='post-footer-line post-footer-line-4'>
           <div class='relatedpoststitle'>RELATED POSTS</div>
        <div id='relatedpostssum'>
              <script type='text/javascript'>showrelated();</script>
            </div>
            <div style='clear:both;'/>
          </div>
        </b:if>
        Screenshot

        Step 6. Click on the Save Template button to save the changes and you're done!

        Note: in case you see the 'undefined' message, make sure that you have added the appropriate labels to your posts - which can be found in at least one more post, otherwise the script may not be able to find any related posts for that entry.

        How To tell Google to Remove your Content or Site from Google Services?

        12.27 0

        Opt out of Google services


        Google, as you might well know has a wide, vertical range of products and services served along the main course that is Google Search. Such services include Google Shopping, Flights, Hotels, Google Advisor, Google Plus Local Search, and so on. Sometimes, some of the content on your site also gets included in these services if relevant. But in some cases, you might not want your content to appear on such products and services. Now you can ask Google not to include your content in search results through your Robots file, but that doesn't really solve the problem does it? It'll take your content off Google entirely. So how to exclude your content from the extra Google services only? Well, Google has now given you a solution in the form of an Opt-out Tool, where you can choose your content to be not included in such products and services.


        Read more »

        Publishers can now review Ads Landing Pages in AdSense

        12.27 0


        Google AdSense


        Google AdSense empowers you with a host of options and features with which you can keep your ad-marketing campaign going smoothly. You have an Ad Review Center, where you get various controls that help with the management of ads on your site. Among other features (see a list of latest AdSense features here), you get the luxury of finding and reviewing quickly and efficiently, hence saving you a lot of time. But that's something we all already knew about. However, Google has very recently introduced a new feature in their Ad Review Center. Previously where you could only review ads themselves, now you can also review the landing pages they lead to.


        Read more »

        New Features for Verification Management in Google Webmaster Tools

        12.29 0


        Businesses these days, whether they be online or otherwise, often tend to be backed up by a partnership of some sort, where more than one individual is running the show. In such situations, the distribution of tools and online resources can be a bit tricky. For example, imagine having to share your website's passwords, or Google Analytic property with your business partner(s). An immediate problem arises here, because you cannot trust anyone with a password. Luckily, Google makes it incredibly easy to share vital tools and resources between partners, such as Google Analytics properties, website verifications through Google Webmaster Tools, mutual-sharing of fan pages, and so on. Google has  now introduced some latest features to go with its management of multiple users feature.


        Read more »

        Google gives Guidelines for Monetizing Flash Gaming Sites

        12.27 0


        Adsense on flash sites

        Small flash games account for lots of hours wasted as pastime. People love playing these small games online, just to take their minds off things for a while. Whether it be a simple game of pool, or a make-believe world of farming, people get hooked up to these games pretty fast, which is why a lot of people like to add them on their sites. There are also a lot of dedicated flash gaming websites out there, and they seem to be making quite some money out there (not a very bad idea for a new blog niche, by the way). For the flash gaming geeks who like to put such games up on their sites, here are a few guidelines from Google you need to be mindful of before monetizing your websites.


        Read more »

        How To Schedule Pins on Pinterest?

        12.27 0


        Scheduling pins on pinterest


        Pinterest is a pretty interesting visual social network that poses quite a conundrum. On the one hand, the idea of pinning and sharing images, and interacting with people over these images seems quite appealing. But on the other hand, there aren't very many marketing features employed by Pinterest, which causes some small businesses to ignore this really useful opportunity. With Facebook, you can schedule your posts, analyze your statistics, and generally spice up your posts. Sadly, no such functionality as stock from Pinterest. Luckily though, there is a tool that will help you schedule your Pins, and enhance/analyze them for more effectiveness.


        Read more »

        CSS Basics. How to Apply Rounded Corners On Images #2

        16.25 0
        blogger tricks, css tricks, border radiusIn the previous post I have mentioned that we will learn about how to create rounded images using CSS, without needing to edit them one by one using a program. Now that we have seen the basics of CSS, let's try to apply it on some pictures.

        What we will do in this tutorial is to upload an image (HTML) and then add some rules in the stylesheet that will transform the outer shape to look like a circle... or, at least, to appear round. This will depend on the proportions of that picture we will use.

        In fact, we can apply this effect to any picture, to a specific part of our blog or to all the pictures found in our blog. This depends on your tastes.

        Marking up HTML

        Obviously, the first thing we need to do in order to set a rounded border around an image is to get a picture and upload it to get the html structure. The code could be a little bit more complicated, but an image is built within the img tag, which basically, looks like this:
        <img src="image_URL"/>
        Screenshot:


        Adding this code inside the HTML of the post with the url of our image - instead of the text in blue - we will be able to display it like this image on the left.

        Usually, it might also contain an alt text, and sometimes, may have some predetermined dimensions (with a specific width and/or height). When we upload an image using the Blogger post editor, the code will also have a link pointing to the original image.

        But if we want to modify this image using CSS, we need to add a class selector. We can add it in two ways: within the img tag or in a parent box. The name that I have chosen for the image selector is roundedcorners, however, you can add any name you want:
        <img class="roundedcorners" src="image_URL"/>


        <div class="roundedcorners">
        <img src="image_URL"/>
        </div>

        Applying style to all homogeneous elements

        But that selector alone won't do anything special. It needs to be linked to a style rule telling what to do with it. The same if when we add just classes, if these are not defined within the CSS, the appearance of a picture (or a certain element) will not change.

        To change the shape of the all the pictures on our blog, this is what we should add to our CSS:
        img {
        border: 2px solid #BADA55;
        margin: 0;
        padding: 0;
        border-radius: 1000px;
        -moz-border-radius: 1000px;
        }
        And how this translates to your browser?

        Search for images by name tag (img) and apply the following style:
        • a solid green border of 2 pixels
        • set the margins (space outside the border) and padding (space inside the border) to zero
        • apply the rounded corner look to all the four corners
        Now that we have this rule in our style sheet itself, we'll be able to see the picture as we want - take a look at the image on the right.

        To declare a property correctly, we need to know what it does and how to write it - details which could be found all over the internet, although W3C is the authority in this.

        For instance, the border-radius property initially requires four (4) values reading from left to right, which represent the roundness of the upper-left, upper-right, lower-right and lower-left corner. If you add a single value, it will make all the four corners to be equal with that value.

        It is important to mention that when the value of the border exceeds the dimensions of the container, this border will create a circle.

        How to apply the same style on the elements of the same container

        Sometimes, we don't want all the images on our blog to be round, but only the ones that we choose, otherwise adding the style above within the head tag will make all the pictures taking this shape. Before, we used an HTML tag (img) and not a selector and, for this reason, the style will affect all our images.
        To avoid this, we can do one of the things we saw at the beginning of this post and that was to place the image inside a div with the roundedcorners class. This way, only the images within the container with that class will be affected by the rule that will make them round.
        <div class="roundedcorners"><img src="image_URL"/></div>
        But the rule then should not affect the img tag directly, but the roundedcorners selector. In this case, you should write it like this:
        .roundedcorners img {
        border: 2px solid #BADA55;
        ....
        }
        This implies that this style applies only to images that are within the container with the roundedcorners class.

        Final words

        To end this tutorial on creating pictures with rounded borders, keep in mind that if these are not square, instead of becoming circular, they will look oval:


        To fix this we should add the width and height with the same measure (value in pixels) to force the image cropping and to make it appear perfectly circular. That was all!

        If you enjoy reading this blog, please share and subscribe. For any questions, drop a comment below ;)

        CSS Basics. How to Apply Rounded Corners On Images #1

        17.48 0
        This tutorial will explain how to change the outside border of any image by using some simple CSS rules to make it round, but this is so easy doing this, that I'm finally going to make this post for other purposes.
        rounded corners, css tricks, blogger tricks, blogger design
        The trick today that I'm going to publish in two parts is to help you to understand, at least, a little of what CSS (Cascading Style Sheets) is.

        For those who would like to learn more, please take a look at this link and for those who really want to learn thoroughly, I recommend to visit this site.

        Introduction and terminology

        Style sheets aim to help sort out what is the structure of a website and which is its format or appearance. So, the CSS box model is, basically, a box that wraps around HTML elements, and determines how those boxes are presented in terms of colors, fonts, width, backgrounds etc.

        The advantage is that, anytime we decide to change something, we don't have to change all the pages one by one, but simply, change the properties from the style sheet and these modifications will automatically apply in all the pages.

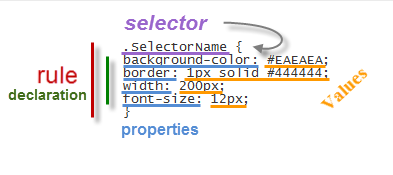
        The style sheet is a set of rules made of selectors and declarations. The selector is to be used as a nickname or name of what you want to configure from the style sheet and apply to the HTML, and declarations are properties to which we add the desired values ​​(more information on CSS syntax)

        Adding the CSS selector

        If we add, for example, the code above in our style sheet, we might not see anything particular happening in our website. As I have mentioned above, the selector relates to the HTML and CSS so, if we want a box to take these values ​​for width, background color, border and font size, we need to include the selector within the HTML of a page element, like this:
        <div class="SelectorName">Text here</div>
        Here we added a rule telling the browser to interpret that this box has to be of a certain type or class. This class or selector could have some specific properties and values ​​defined in the style sheet, as you can see in the image above.

        Now let's see how this will change the look of the box, while all others that don't have the SelectorName  name will follow the standard appearance.

        Basically, when we add a rule in a style sheet, or modify an existing one, what happens is that all boxes marked with that selector will change their appearance according to the properties and values that we have defined in the style sheet.


        Where to add the CSS style

        This style can be added in external CSS files - create the CSS file with all the rules, upload it on a hosting site and get the URL of the file. To make use of it, include the following line in the header of your template. For Blogger, you can add it between <head> and <b:skin><![CDATA[/*:
        <link href="syle.css" rel="stylesheet" type="text/css"/>
        Note: replace the text in blue with the url of the CSS file.

        You can also add the style directly in the HTML of the template by adding the CSS between the style tags:
        <style>
        .SelectorName {
        background-color: #EAEAEA;
        border: 1px solid #444444;
        width: 200px;
        font-size: 12px;
        }
        </style>
        This can be added in the HTML of a page element as well. In this case, you don't need to add any selector to indicate where the CSS style is:
        <div style="background-color: #EAEAEA; border: 1px solid #444444; width: 200px; font-size: 12px;">Text here</div>
        In Blogger, the rules are between the <b:skin><![CDATA[/* and ]]></b:skin> skin tags. If we access the HTML of our template, we will find a bunch of codes in between these tags, which is actually the CSS styling that defines the appearance of our blog.

        For those who don't want to touch the template code, we can add the CSS directly by going to the Blogger Template designer > Advanced > Add CSS.


        That's enough for today. In the next tutorial we'll get to know how to add rounded corners to our images using CSS -> how to set a rounded borders around an image using CSS.

        Download Google's Latest Cheat Sheet eBook To Optimize your site

        12.27 0


        Whether you are a beginner looking to make a mark on the internet or just wanting to learn some stuff, or a pro who wants serious business online, Google is always there to help you. At the Google Webmaster Central blog, you will find any number of news, tutorials, tips, and best practices involved with webmastering. Google wants to help you out in making your content available to the world, and has released many items related to Search Engine Optimization, Google released an eBook some time ago which contained all the basic SEO tips you could think of in a nutshell. Well now, for starters, Google has released a new one-page quick-start eBook which captures the essence of SEO as it is used today.


        Read more »

        10 Places to put Adsense ads in Blogger

        14.20 0
        In this article we'll talk about the most common 10 places in our blog where we can add AdSense ads and about how we can implement these and we'll get to know as well which are the most suitable formats based on those available in our AdSense account.

        Adsense Advertisements

        In the Sidebar

        adsense, ads, add adsense blogger

        How to implement

        This is one of the easiest areas to put AdSense. Just go to the Page Elements (Layout), click on the "Add a Gadget" link, then add an HTML/Javascript widget with your ad code inside it or add directly an AdSense widget.

        Recommended formats: 125 × 125, 120 × 600 and 160 × 600, 300 x 600

        Between posts

        blogger posts, blogger tricks, adsense ads

        Implementation. You can add AdSense ads between your posts by going to Layout, click on the "Edit" link below the Blog Posts section, then check the "Show Ads Between Posts" option.

        Recommended formats: 468 × 60, 300 × 250 and 336 × 280

        Under the header

        blogger header, blogger tips, adsense

        Implementation:

        Before anything, you need to convert your AdSense ad code - you can use this converter here:

        AdSense Ad Converter

        Next thing to do is to go to your Blogger Template (log in to your Blogger Dashboard, click on Template and press the Edit HTML button) and click anywhere inside the code area to search for the following code using the CTRL + F keys:
        <div id='header-wrapper'>
        Paste the converted code right after it.

        Recommended formats: 728 × 90 and 728 × 15

        Above the blog posts


        make money, adsense, blogger tutorials

        Implementation:

        Convert your ad code and search for <div id='main-wrapper'> in your template.

        Paste the converted code right after it.

        Recommended formats: 460 × 68, 468 × 15 and 336 × 280

        Under the post title (this will be visible on all the pages)

        money online, blogger tricks, how to blogger
        Implementation:

        Convert your AdSense ad code and go to your Template > Edit HTML > click anywhere inside the code area and search for the following line (CTRL + F):
        <div class='post-header-line-1'/>
        Note: if you can't find it, search it without the ending slash /

        Paste the converted code right after it.

        Recommended formats: 468 × 68 and 468 × 15

        Under the post title (visible only on the posts pages)

        Implementation:

        Convert your ad code and then go to your Template, click anywhere inside the code area and look for:
        <div class='post-header-line-1'/>
        Note: if you can't find it, search it without the trailing slash /

        Paste the converted code, following this example:
        <b:if cond='data:blog.pageType == "item"'>

        <!-- Add here the code of your ad -->

        </b:if>
        Recommended formats: 468x68 and 468x15

        In the posts' footer

        post footer, adsense, blogger blogspot

        Implementation:

        Convert your ad code and then go to your Template > click anywhere inside the code area and look for:
        <p class='post-footer-line post-footer-line-3'/>
        Note: if you can't find it, search it without the trailing slash /

        Paste the converted code right after this line.

        Recommended formats: 468x68 and 468x15

        In the post's body (it will be visible on all pages)

        adsense how to, blogger tricks, gadgets

        Implementation:

        Convert your ad code and then go to your Template > click anywhere inside the code area and look for:
        <div class='post-body entry-content'>
        Note: in case you don't fint this code, search only for <div class='post-body'>

        And paste the converted code by following the example below:
        <div style='float:right'>

        <!-- Add here the code of your ad -->

        </div>
        Recommended formats: 125x125, 180x150, 120x240 and 200x200

        In the post's body (visible only in post pages)

        Convert your ad code and then go to your Template, click anywhere inside the cod area and look for:
        <div class='post-body entry-content'>
        Note: in case you don't fint this code, search only for <div class='post-body'> 

        And paste the converted code by following this example:
        <b:if cond='data:blog.pageType == "item"'>
        <div style='float:right'>

        <!-- Add here the code of your ad -->

        </div>
        </b:if>
        Recommended formats: 125x125, 180x150, 120x240 and 200x200

        Between post and comments (visible only on posts pages)


        Implementation:

        Convert your ad code and then go to your Template, click anywhere inside the code area and look for:
        </b:includable>
        <b:includable id='postQuickEdit' var='post'>
        Paste the converted code just above it, following this example:
        <b:if cond='data:blog.pageType == "item"'>

        <!-- Add here the code of your ad -->

        </b:if>
        Recommended formats: 468x60, 300x250 and 336x280

        In the blog's footer

        blogger footer, adsense ads, make money online

        Implementation:

        Convert your ad code and then go to your Template, click anywhere inside the code area and look for:
        <div id='footer-wrapper'>
        Paste the converted code right after it.

        Recommended formats: 728x90 and 728x15

        FAQ

        Some questions that are likely to arise:

        I can't find the codes, what should I do?
        When searching for a specific code, make sure that you have no spaces before/after it. These are the default codes of Blogger and should be found in all the templates unless they have been modified by the template designer.

        Why should I convert my AdSense code?
        The Blogger's Template reads it as text and not as code so it is better to avoid any errors when trying to save it.

        The ads are not displaying properly, why is that?
        The ads could be affected by the styles (CSS) selectors (divs) containing them and some templates could be wrong designed, then you should consider modifying these styles, look for another relevant place or in extreme cases, change the template.

        Can I put the all 10 codes on my blog?
        No, you should choose just one of the locations where you want to put the ads considering that AdSense have some limits on the number of ads that could be displayed. Try to make a balance with your content.

        Why there should be only 3 ads displayed on the main page?
        This is due to the limit set by AdSense. Combine the type of ads (text, rich media ads and link units) if you want to show more ads.
        Hopefully, this guide will be useful to those of you who need to display AdSense ads on your blog.

        Can Someone Steal Ownership of your Site in Webmaster Tools?

        12.27 0


        Site ownership

        For webmasters, verifying ownership of their website is very important, since it establishes an official connection between you and your website. It is one of the factors among many others that decides a site's trust. Every webmaster has to get his site verified in Google Webmaster Tools to help Google recognize ownership for that site, and provide some advanced tools to the webmaster. But there's one thing that might concern a few people regarding ownership. There are many blogs and websites where people who aren't the owners have access to the site's source code, at least the <body> part of a website. So what if someone adds a meta tag with the body tag and steals ownership of your website?


        Read more »

        Recent Comments Widget with Hide Author Comments function For Blogger

        17.09 0
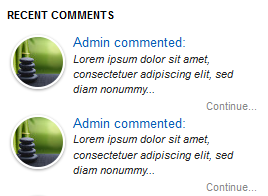
        A few days ago, Mrpolie asked if there's a way to hide the author comments in the Recent Comments widget so that we would be able to see only readers' comments and our replies to be hidden. So, in this post I'll be sharing with you the Recent Comments widget that comes with this function. If you want to show just blog readers' comments rather than yours, you have just to change "Blogger User" text with the surname under which you are posting.

        recent comments widget, recent comments, blogger

        The main features of this recent comments widget:

        - You'll be able to hide your comments
        - Change the avatar size
        - Set the number of comments to display
        - Set the length of comment for the widget to display

        Recent Comments Widget with Hide Author Function


        Step 1. From your Blogger Dashboard, go to Layout and click on Add a Gadget link


        Step 2. In the pop-up window, choose the HTML/JavaScript widget


        Step 3. Copy-paste the following code:

        Recent Comments Widget with Round Avatars: 

        Click to see the code

        Recent Comments Widget With Post Titles (no avatars): 

        Click to see the code

        Some changes before saving it.

        - to set the number of comments to be shown, change the "5" value from the orange line
        - for the number of characters, change the "67" (for the 2nd widget, it is 95) value from the green line
        - to hide your comments, replace the Blogger User text TWICE with your username
        - to change the size of avatar, change "50" from the blue line.
        - if you don't want rounded avatars, delete this line:

        -webkit-border-radius: 100px;-moz-border-radius: 100px;border-radius: 100px;
        Step 4. Save your widget and you're done!

        Arsip Blog