"For many bloggers, having a custom favicon (the tiny image displayed in your browser’s window or tab) is the finishing touch that ties together the design and identity of a great looking blog. Today, we're pleased to announce that Blogger in Draft users can now add a customized favicon to their blog. ~Blogger in Draft"
How To Add a Favicon to Your Blogger Blog
Step 1. Log in to your Blogger's Dashboard, go to the Layout and click on Add a Gadget link
Step 2. Click on the "Edit" link on the "Favicon" setting above the navbar element.
Step 3. A popup window will open where you can search for an image in your hard drive to replace the default favicon image. Click on "Browse" button and search for your favicon (it should have the .ico extension) - then click on "Save".
Step 4. Now you should see your own favicon instead of blogger's default favicon.
It might take some time until your new favicon will appear in your Browser's tab or window.
If you want to add animated favicons to your Blogger blogs, then follow this method below.
How to add an animated favicon in Blogger
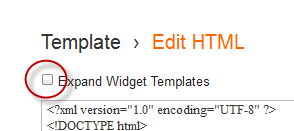
Step 1. Log in to your Blogger account > Template > Edit HTML (if needed, click on Proceed button)
Step 2. Select the "Expand widget templates" box
Step 3. Search (CTRL + F) for:
<b:skin>
Step 4. Paste this code just above it:
<link href="your-favicon-links-goes-here" rel="icon" type="image/gif"/>
See the screenshot for more details
Note: replace your-favicon-links-goes-here with your favicon's link location
You can choose from here some cool favicons for your site/blog: http://www.favicon.cc/ (just download the favicon you like - upload it on tinypic or on a blogger's post, then copy the link address/direct link)
Step 5. Save the Template. And you're done!


EmoticonEmoticon