Now here is a wonderful hack for displaying related posts beneath each of your blog posts, along with thumbnails. The related articles are chosen from other posts in that same category/label/tag. With this hack many of your readers will remain on your site for longer periods of time when they see related posts of interest.
Related: Related Posts Widget with Thumbnails and Summaries
Step 2. Click anywhere inside the code area and press the CTRL + F keys:
Step 3. Search for this piece of code adding it inside the search box (hit Enter to find it):
- to change the width and height of thumbnails, modify the 110px and 100px values in red
- to change the color and size of related posts titles, change the value in blue
- remove the line in violet if you want the related posts to be displayed both in homepage and post pages.
Step 5. Find the line below (you will find two times, but you need to stop at the second one):
- change the 5 value from max-results=5 with the number of posts you want to be displayed
- if you want the related posts to be displayed on homepage too, then remove the lines in violet
Update! If you are unable to see the related posts widget after saving the template, add the code (step 5) just above the </b:includable> tag which can be found above this line (CTRL + F to find it):
Step 7. Save the Template and that's it. Now the Related Posts widget should appear below each blog post that has labels on it. Enjoy!
Related: Related Posts Widget with Thumbnails and Summaries
Adding the Related Posts Widget to Blogger/Blogspot
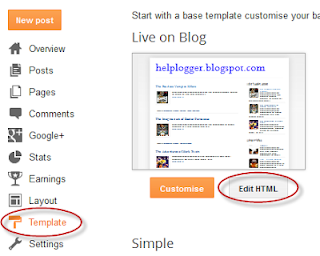
Step 1. Log in to your Blogger account and go to Template > Edit HTMLStep 2. Click anywhere inside the code area and press the CTRL + F keys:
Step 3. Search for this piece of code adding it inside the search box (hit Enter to find it):
</head>Step 4. Copy and paste the below code just before/above the </head> tag:
<!--Related Posts with thumbnails Scripts and Styles Start-->Note:
<b:if cond='data:blog.pageType == "item"'>
<style type='text/css'>
#related-posts{float:left;width:auto;}
#related-posts a{border-right: 1px dotted #eaeaea;}
#related-posts a:hover{background: #EEEEEE;}
#related-posts h2{margin-top: 10px;background:none;font:18px Oswald;padding:3px;color:#999999; text-transform:uppercase;}
#related-posts .related_img {margin:5px;border:2px solid #f2f2f2;width:110px;height:100px;transition:all 300ms ease-in-out;-webkit-transition:all 300ms ease-in-out;-moz-transition:all 300ms ease-in-out;-o-transition:all 300ms ease-in-out;-ms-transition:all 300ms ease-in-out;-webkit-border-radius: 5px; -moz-border-radius: 5px; border-radius: 5px; }
#related-title {color:#666;text-align:center;padding: 0px 5px 10px;font-size:12px;width:110px; height: 40px;}
#related-posts .related_img:hover{border:2px solid #E8E8E8;opacity:.7;filter:alpha(opacity=70);-moz-opacity:.7;-khtml-opacity:.7}</style>
<script type='text/javascript' src='http://helplogger.googlecode.com/svn/trunk/relatedposts.js' />
</b:if>
<!--Related Posts with thumbnails Scripts and Styles End-->
- to change the width and height of thumbnails, modify the 110px and 100px values in red
- to change the color and size of related posts titles, change the value in blue
- remove the line in violet if you want the related posts to be displayed both in homepage and post pages.
Step 5. Find the line below (you will find two times, but you need to stop at the second one):
<div class='post-footer'>Step 6. Just above <div class='post-footer'> paste this code:
<!-- Related Posts with Thumbnails Code Start-->Note:
<b:if cond='data:blog.pageType == "item"'>
<div id='related-posts'>
<b:loop values='data:post.labels' var='label'>
<b:if cond='data:label.isLast != "true"'>
</b:if>
<script expr:src='"/feeds/posts/default/-/" + data:label.name + "?alt=json-in-script&callback=related_results_labels_thumbs&max-results=5"' type='text/javascript'/></b:loop>
<script type='text/javascript'>
var currentposturl="<data:post.url/>";
var maxresults=5;
var relatedpoststitle="<b>Related Posts:</b>";
removeRelatedDuplicates_thumbs();
printRelatedLabels_thumbs();
</script>
</div><div class='clear'/><div style="font-size: 9px;float: right; margin: 5px;"><a style="font-size: 9px; text-decoration: none;" href="http://helplogger.blogspot.com/2012/03/how-to-add-related-posts-widget-to.html" rel="nofollow" >Related Posts Widget</a></div>
</b:if>
<!-- Related Posts with Thumbnails Code End-->
- change the 5 value from max-results=5 with the number of posts you want to be displayed
- if you want the related posts to be displayed on homepage too, then remove the lines in violet
Update! If you are unable to see the related posts widget after saving the template, add the code (step 5) just above the </b:includable> tag which can be found above this line (CTRL + F to find it):
<b:includable id='postQuickEdit' var='post'>For more info, click on this screenshot below:
Step 7. Save the Template and that's it. Now the Related Posts widget should appear below each blog post that has labels on it. Enjoy!


