How To Get Your Site Noticed in Google?

11.11 0

Get your site noticed in Google


So by now, you should have learnt what it takes to build a great website, and how to get it started (provided you have followed this series ofcourse!). What's the next step? To be successful, (almost) every inch of your website should be visible to search engines. But more than that, these search engines should be able to notice your website. In case of Google, some of the steps required include setting up a Webmaster Tools account, submitting your website's sitemap, and making sure your site is all set to be noticed.

Read more »

How To Monitor Your Facebook Page's Negative Feedback?

11.11 0


Facebook Negative Feedback

Recently, we talked about the Facebook EdgeRank algorithm, and how it has evolved over time. Facebook values in a lot of quality factors, which collectively decide how many people can a post reach. A couple days ago, we talked about Negative Feedback, and how important it has become to Facebook. You might be doing every conceivable trick to grow your reach, but could still be losing it, as a result of being held down by negative feedback. Today, we'll talk about how to monitor negative feedback on your Facebook Page.

Read more »

The Reason Why Facebook Pages Are Losing Reach?

11.11 0


The Reason Why Facebook Pages Are Losing Reach?

Most of you already know that Facebook has evolved its EdgeRank algorithm over time, which means that Page admins need to have some tricks up their sleeves in order to get a higher reach. Facebook values in a lot of quality factors, which collectively decide how many people can a post reach. But did you know that Facebook is now heavily weighing in negative feedback for posts in order to rank them? Are you doing everything you can to grow your reach, but still losing your reach? We might have an answer.

Read more »

Highlights of our Exciting Experience at 'Pakistan Festival 2014'

11.11 0

Online Business - A Love AffairCovering institutes across the country with the message of entrepreneurship and youth awareness, is an obligation that STC Network is trying our best to fulfill for the past 5 years. Communicating with a qualified public is indeed a simple task but conveying your message in simple words to an excited crowd of thousands consisting of mostly school children and housewives in national language was the toughest challenge of all. Pakistan Festival 2014 has therefore become the most memorable event of my life where we learnt a lot. Pakistan Helpline in association with Talib e Ilm Society, Anima and students across Karachi had organized a successful event on 23rd March 2014 at EXPO center, to share the spirit of being a devoted and loyal Pakistani. People from across the city participated in it including Nisar Ahmed khuhro (former Speaker of the Provincial Assembly of Sindh) , Dr Fauzia Siddiqui requires no introduction, Altaf Shakoor (President Pasban), Abid Beli, city Police commissioner, ARY TV Anchor Iqrar Ul Hasan (Host Sare Aam), Celeb Faisal Qureshi, Syed Qaiser Mehmood, NGO heads and a lot more amongst guests.

Read more »

How To Get Your New Website Started in Google?

11.11 0

How To Get Your New Website Started in Google?


So you've created a great website and want to take it to the skies? To get there, you need to go forward step-by-step without skipping any, because it could cost you a lot of time and effort. Once you have a site up and running, it is now time to fine-tune it and present it to Google. In this post, we'll talk about getting your site in Google, and some of the basic tips from Google Webmaster Academy on optimizing it.

Read more »

5 Easy Ways to Improve the SEO of a blog & Boost Traffic

11.18 0
5 easy ways to improve the SEO of a blog 

A blogger needs to know at least the minimum on SEO. For it, you don't need to be an SEO expert but you need to know the minimum so that your posts are well indexed in the search engines.

The phrase "content is king" is one of the widest spread Internet memes being used by so many bloggers, with the idea that you should focus on having quality content, while the rest don't matter much. This is not true. Quality content is important, but it shouldn't be the only concern of a blogger today. In addition to producing quality content, your text needs to be optimized for the search engines.

improve seo, seo tips, boost traffic
Boost traffic & increase SERP visibility with SEO

5 easy ways to improve the SEO of a blog

Now, let's see what would be the basics that any blogger needs to learn about SEO and other simple SEO knowledge. Below are 5 easy tips to improve the SEO of your blog:

1. Define the keyword

When you write a post, it is recommended to choose the keyword (or term) suitable for your text. What you want is that this keyword - or term - to be searched on Google, and then get your post among the top. For this, you need to use this keyword a few times in the text.

For example, here the keyword could be SEO, but this term is too generic and I could hardly get in the top for this search. Then I'll work with a phrase or a long tail keyword, so that this post will rank for the term "easy ways to improve the SEO of a blog". I will use this phrase a few times, but without overdoing it.

2. Use the keyword in the post title

Now that I have defined the keyword, I will use it in the post title. This step is very important, and certainly will help you to get a better rank in search engines. As you can see, what I have in the title is the easy ways to improve the SEO of a blog keyword, along with other words to form an attractive and optimized title for SEO.

3. Use the keyword in the H2 tags

You must also use heading tags (h2, h3) in your posts. Here, I am using the keyword "easy ways to improve the SEO of a blog" in a H2 heading. Do this always, because it also helps to become well positioned in the search results. If you don't know or don't understand what are the heading tags, I would suggest to do a further research on this subject.

use keyword in h2 tags

4. Use the keyword in the text

Make use of your chosen keywords throughout the text. Especially in the first paragraph (please note that I have repeated the title in italics in the first sentence). But be careful when doing this, there is a maximum and minimum limit for that. A good keyword density is between 1.5% to 4.5% for best results. Less than that will have no effect and more than that can alert the search engines and your text might be considered spam.

5. Publish Posts with 300 words or more

Posts under 300 words have little chance to be among the top results in search engines. Of course, you will be able to rank for multiple keywords that are less popular with less than 300 words, but for the most competitive keywords that have the potential to bring a greater number of visits, it will be nearly impossible.

Thus, it is recommended to write posts with more than 300 words. It's not hard when you really understand the topic you're talking about.

Conclusion

As you can see, with some simple SEO techniques you can improve the traffic coming to your blog from the search engines. I hope you enjoyed these 5 easy ways to improve the SEO of a blog!

How The New Google Interface Has Changed SEO For Titles?

11.11 0


You might have noticed the recent changes in the Google Search Engine Result Pages user-interface. While being subtle and discreet, some of these changes could have a profound impact on SEO. The titles, for example, have had a bit of an overhaul, and are now more unpredictable than ever. The onset of these new development could change the way we do SEO. Here's how the SEO for title tags has changed.

Read more »

What is the difference between padding and margins?

08.28 0
For those who would like to know more about HTML and CSS, today we will see about the difference between margin and padding CSS properties which allow us to add blank space between the HTML elements, preventing the elements from getting 'stuck' together.

Although both possess similar functions, each has its particularity. 
  1. Padding determines the inner margins, being responsible for determining the distance between the content of a given element and its border.
  2. Margin is applied to the outside of an element affecting how far the element is away from other elements.
For more info, please take a look at the picture below:

padding and margin, css proprieties
Difference between margin and padding

Just as you have the option to define the borders for each side of your HTML elements (eg. borders in the sidebar), you can do the same with the margin and padding properties. All you need to to do is to change the top, right, bottom and left values​​.
These values ​​that you can select include: pixels (px), centimeters (cm), millimeters (mm). em units (em), x-height (ex), inches (in), picas (pc) and point sizes (pt).

By using margin and padding, you should add each value set in the four corners, as follows: top, right, bottom, left and each value must refer to each side of the HTML element. The first value is for the top, and they follow a clockwise direction, so the value would be close to the right, then bottom and finally, left.

Example 1: 

padding:5px 15px 5px 15px;
- top padding is 5px 
- right padding is 15px 
- bottom padding is 5px 
- left padding is 15px  

margin: 10px 5px 10px 5px;
- top margin is 10px
- right margin is 5px
- bottom margin is 10px
- left margin is 5px

If you define a single value, the distance applies to all sides, so it will be applied to the 4 sides of the HTML element that you want to modify.

Example 2:
padding: 5px (top and bottom) 15px (left and right);
margin: 10px (top and bottom) 5px (left and right);

If it helps to do it visually, think of an A4 page of type inside a picture frame. The margin is the space between the edge of the sheet of paper and the other elements (the parts of the frame) and the padding would be the space between the edge of the sheet and where the type starts on the page. The border would be the edge of the sheet of paper.

It's probably easier to understand if you have borders, then it also becomes obvious which one to use. Do you want the "space" after the border (outside the element = margin) or before the border (inside the element = padding).

How To Create A Great Website That Is Valuable To Your Audience?

10.51 0

How To Create A Great Website?


Are you an entrepreneur looking to set up a new blog or website? The Google Webmaster Academy can help! Ever since its launch in 2012, it has helped hundreds and thousands of webmasters take their websites from mere startups to large money-making ventures. However, going over each resource from the academy can be time-consuming. Here's our version on how to build a website from scratch to greatness.

Read more »

How to use Pinterest Rich Pins with Blogger?

11.11 0


How to use Pinterest Rich Pins?

Are you using Pinterest effectively to drive more engagement to your blog? Pinterest is a great but underestimated marketing tool that individuals and businesses can use to drive more people to their site, or let them know more about what they do. Pins can help people discover the content that they like. As it stands, you can't be using Pinterest effectively unless you know what rich pins are, and how to use them. They provide a better way to show pinners information on your site.

Read more »

Google to Feature Music Artists' Event Schedule From Their Website!

11.11 0


Google To Feature Data From Music Artists' Websites

You might have noticed that when you search for your favorite band on Google, you don't just get search results, but a knowledge graph with information about that band, upcoming event schedule, discography, and so on. While useful, this information isn't very accurate, because the data is pulled from various different sources. Google has just announced that it will now get this data directly from the Artists' official website, which means that if you're a music artist or a band, then you should read through the rest of this post!

Read more »

Top 10 Female Entrepreneurs of Iran in 2014

11.11 0


female Entrepreneurs of Iran


In this so male-dominated world, a woman can be a president of a country, a designer of a leading brand, an owner of an successful business,while still being a devoted mother,caring daughter and a obedient wife. In short, women are no way behind than the males and this idea goes pretty well when we talk about the females of Iran. Iran is one of those countries that are known for following their traditions strictly but the best part of this nation is the liberty it has given to its women who are found to be extra creative in all major domains.


Here are top 10 female entrepreneurs of Iran. Have a look!

Read more »

How to Show AdSense Ads between Posts in Blogger?

11.11 0


Display AdSense ads between posts

Google AdSense is the widely popular ad-network used by millions of bloggers worldwide. It has helped many build their careers online. If you're a blogger, then you should know about the importance of optimizing AdSense ads to maximize revenue. Speaking of which, we have a trick for you for adding AdSense ads between your posts, so as to increase the ad-visibility and ultimately the click-through rate and revenue.

Read more »

Facebook Will Buy Internet At $54 Trillion! Really?

11.11 0


Facebook Will Buy Internet At $54 TrillionThe name Facebook is not new to anyone, it is today’s most famous online social networking website or service that came from a idiom for the encyclopedia which was handed over to some of the students of some American university. The founder of Facebook is Mark Zuckerberg in collaboration with the colleagues named Eduardo Saverin, Andrew McCollum, Dustin Moskovitz and Chris Hughes. It is due to its immense success that now it is considered as worlds 5th most successful startup company of all times in terms of its market capitalization, in terms of its revenue generation and the speed of its growth. After a chain of great successes, Facebook is now again ready to surprise its users by making its largest requisition.

Read more »

How To Add Bing or Google Maps in Pinterest?‏

11.11 0

Add Map Location to Pinterest


Like using Pinterest? Let your followers know where you are by pinning maps to your Pinboards! You can pin your business location, event locations, or places you're going to visit in order to let your fans know beforehand when and where you're going to be! This strategy can help you get more reach, especially with locals from your area of business. Google and Bing don't let you Pin a map location, but that shouldn't stop you from telling people where you are!

Read more »

We are Coming to Pakistan Festival 2014!

11.11 0

Mohammad with Pakistan-Festival-Team

karachiites surprise! Pakistan Helpline in association with Talib e Ilm Society, Anima and students across Karachi has organized a mega event on 23rd March 2014 at EXPO center, to share the spirit of being a devoted and loyal Pakistani. 23 March holds great respect in attaining a separate state for Muslims. It was that famous resolution at Lahore that led to the creation of this great new country for Muslims.

It was a pleasure meeting President of TALIB E ILM Society (Syed Ali Raza) and Ayesha Gull (President Anima "Towards Light" ) at my house.  After a detailed talk we have confirmed our participation in the event at the annual Pakistan Festival at city's biggest EXPO Center. I was extremely delighted to meet Ayesha and Syed Raza Ali, people with extreme potential and energy. It is amongst the biggest events that will bring a crowd of over 3000 people from across the country on a single platform. I have a lot to share with you all, that most of you missed at Unexplored Success Treasures. Its time to meet Karachi with a lot of fun and excitement!

Read more »

How To Convert to a Pinterest Business Account?

11.11 0

Pinterest for business


If you are a business owner or a Blogger, you might be interested in joining Pinterest as a Business. A lot of people who joined Pinterest ages ago have personal accounts on Pinterest, and not business ones. Business accounts give you access to advanced features such as Pinterest Web Analytics. If you don't have a business account, that doesn't mean you have to forego your followers, and start over again. You can convert your existing Pinterest profiles to become business accounts.

Read more »

Top 10 Women Entrepreneurs of Pakistan in 2014

11.11 0


Women Entrepreneurs of PakistanThough Pakistan is one of the most controversial countries in the world out there, the fact remains constant that this country has a lot of potential and when it comes to especially the women power. We did discuss a detailed article on the top 10 powerful women of India who are known for their entrepreneur skills and here we are again with the top 10 women entrepreneurs of Pakistan in 2014. Have a look!

Read more »

How Can You Build A Career in Professional Gaming?

11.11 0

How To Make a Career in Professional Gaming?


If you play games a lot, especially multiplayer ones, you probably know something about gaming tournaments around the world, like the DOTA 2 championship in Seattle last year where a Swedish team took home nearly $1.4 Million in reward money, along with some goodies. Gamers are now recognized as pro-athletes in the U.S, and people as young as 13 years of age are competing. Why? Simply because there's a whole career to be made in professional, or eSports gaming, and some people have done just that!

Read more »

Top Free On-Page Optimization Tools To Improve Your Site's SEO

11.11 0


On-page SEO tools


Is your content not performing well enough in search engines? Are you worried about your site's SEO? As much as quality content is important, you cannot ignore the importance of on-page SEO. It is unavoidable, no matter what sort of online presence you have, whether it be a blog, online service or store. Without making sure search bots can understand and read your pages correctly, all other efforts won’t be as efficient (or complete).

Read more »

Add a Custom jQuery Lightbox To Blogger

19.43 0
If you are not satisfied with the default Lightbox set up by Blogger, here's another amazing way to show off your pictures. If you've missed out, I have already shown in one of my posts how to customize the Blogger Lightbox by changing the background color, borders or the text color, but this tutorial will show you how to replace it entirely with a cool jQuery Lightbox plugin that is very popular among bloggers.

What this Lightbox does, is to display larger versions of the images that will pop-up into a larger box once we click on them, and allows us to easily navigate through that set of photos by using the previous and next buttons.

jquery lightbox, blogger plugins

To see it in action, please visit the following demo blog and click on any picture to enlarge it.


Adding jQuery Lightbox to Blogger

Step 1. From your Blogger Dashboard, click on Template > Edit HTML

blogger edit html

Step 2. Click anywhere on the code area and press the CTRL + F keys to open the search box. Paste the following tag inside the search box and hit Enter to find it:
]]></b:skin>
Step 3. Choose one of the Lighbox styles from below and paste the CSS code just above the aforementioned ]]></b:skin> tag:

Custom Blogger Lightbox with White Background


jquery lightbox white
#jquery-overlay{position:absolute;top:0;left:0;z-index:90;width:100%;height:500px;}
#jquery-lightbox{position:absolute;top:10%;left:0;width:100%;z-index:100;text-align:center;line-height:0;}
#jquery-lightbox a,#jquery-lightbox a:hover{border:none;}
#jquery-lightbox a img{border:none;}
#lightbox-container-image-box{position:relative;background-color:#fff;max-width: 960px;max-height: 560px;margin:0 auto;}
#lightbox-container-image{padding:10px;}
img#lightbox-image {max-height: 540px;max-width: 940px;}
#lightbox-loading{position:absolute;top:40%;left:0%;height:25%;width:100%;text-align:center;line-height:0;}
#lightbox-nav{position:absolute;top:0;left:0;height:100%;width: 100%;z-index:10;}
#lightbox-container-image-box > #lightbox-nav{left:0;}
#lightbox-nav a{outline:none;}
#lightbox-nav-btnPrev,#lightbox-nav-btnNext{width:49%;height:100%;zoom:1;display:block;}
#lightbox-nav-btnPrev{left:10%;float:left;}
#lightbox-nav-btnNext{right:10%;float:right;}
#lightbox-container-image-data-box{font:10px Verdana,Helvetica,sans-serif;background-color:#fff;margin:0 auto;line-height:1.4em;overflow:auto;max-width: 940px;;padding:0 10px 0;}
#lightbox-container-image-data{padding:0 10px;color:#555;}
#lightbox-container-image-data #lightbox-image-details{width:70%;float:left;text-align:left;}
#lightbox-image-details-caption{font-weight:bold;}
#lightbox-image-details-currentNumber{display:block;clear:left;padding-bottom:1.0em;}
#lightbox-secNav-btnClose{width:66px;float:right;padding-bottom:0.7em;}

Custom Blogger Lightbox with Dark Background:


jquery lightbox dark
#jquery-overlay{position:absolute;top:0;left:0;z-index:90;width:100%;height:500px;}
#jquery-lightbox{position:absolute;top:10%;left:0;width:100%;z-index:100;text-align:center;line-height:0}
#jquery-lightbox a,#jquery-lightbox a:hover{border:none}
#jquery-lightbox a img{border:none;}
#lightbox-container-image-box{position:relative;background-color:#000;max-width: 960px;max-height: 560px;margin:0 auto}
#lightbox-container-image{padding:10px;}
img#lightbox-image {max-height: 540px;max-width: 940px;}
#lightbox-loading{position:absolute;top:40%;left:0%;height:25%;width:100%;text-align:center;line-height:0}
#lightbox-nav{position:absolute;top:0;left:0;height:100%;width: 100%;z-index:10}
#lightbox-container-image-box > #lightbox-nav{left:0;}
#lightbox-nav a{outline:none}
#lightbox-nav-btnPrev,#lightbox-nav-btnNext{width:49%;height:100%;zoom:1;display:block}
#lightbox-nav-btnPrev{left:10%;float:left}
#lightbox-nav-btnNext{right:10%;float:right}
#lightbox-container-image-data-box{font:10px Verdana,Helvetica,sans-serif;background-color:#000;margin:0 auto;line-height:1.4em;overflow:auto;max-width: 940px;;padding:0 10px 0}
#lightbox-container-image-data{padding:0 10px;color:#fff}
#lightbox-container-image-data #lightbox-image-details{width:70%;float:left;text-align:left}
#lightbox-image-details-caption{font-weight:bold}
#lightbox-image-details-currentNumber{display:block;clear:left;padding-bottom:1.0em}
#lightbox-secNav-btnClose{width:66px;float:right;padding-bottom:0.7em}
Step 4. Now find the following tag and just above it, add the below scripts:
</head>

Script for Lightbox with White Background:

   <script src='http://ajax.googleapis.com/ajax/libs/jquery/1/jquery.min.js' type='text/javascript'/>
    <script src='http://helplogger.googlecode.com/svn/trunk/custom-lightbox-for-blogger.js' type='text/javascript'/>

Script for Lightbox with Dark Background:

<script src='http://ajax.googleapis.com/ajax/libs/jquery/1/jquery.min.js' type='text/javascript'/>
    <script src='http://helplogger.googlecode.com/svn/trunk/custom-lightbox-for-blogger-black.js' type='text/javascript'/>
Step 5. Click on the "Save template" button to save the changes.

Finally, we need to disable the original Blogger Lightbox so that it doesn't interfere with this one that we just added: go to "Settings" > "Posts and comments" and on the right side, you will see the "Showcase images with Lightbox" section > select "No" and click on the "Save settings" button on the upper right side.

disable blogger lightbox

Now, view your blog and click on any image to see this Custom Blogger Lightbox in action. Enjoy!

How to Use Cookies in Javascript

13.41 0
Each time we visit a website, cookies can be stored to 'remember' things that we do while browsing a page. This may happen, for example, when we visit a page where we have to login with an username and a password. In this case, after verifying that the login is correct, usually a cookie is recorded on our computer.

An example would be the popular page of Google. This search engine allows users to choose how many search results they want to see on each page. Thanks to a cookie, this configuration remains unchanged for each computer, even after rebooting several sessions. Despite this, it is good to remove them from time to time because, although, some will expire being erased automatically after a while, some of them will never do so.
cookies with javascript, blogger tricks

Like many other things, cookies may suffer a poor use and hence their bad reputation. For instance, some websites can store and study the browsing habits of a user without their knowledge. This is why most browsers already include a system to filter them and can decide if they will provide some privacy or not.

If you want to see a live example of how a cookie works, please visit this page and refresh it a few times. You should get an alert window telling you about how many times you visited the page.
(script source: javascriptkit.com)

There could be other ways to use cookies but a server could do this with JavaScript. Below we have a simple script that can be used as many times we want, even for different purposes. Basically, what the following script does is to create three functions: the first one is to set a cookie, the second one is to read it, and the last one is to erase it. We can apply it in Blogger by accessing the template HTML and add it just before the </head> tag:
<script type='text/javascript'>
//<![CDATA[

// Set cookie
function setCookie(name, value, expires, path, domain, secure) {
document.cookie = name + "=" + escape(value) +
((expires == null) ? "" : "; expires=" + expires.toGMTString()) +
((path == null) ? "" : "; path=" + path) +
((domain == null) ? "" : "; domain=" + domain) +
((secure == null) ? "" : "; secure");
}

// Read cookie
function getCookie(name){
var cname = name + "=";
var dc = document.cookie;
if (dc.length > 0) {
begin = dc.indexOf(cname);
if (begin != -1) {
begin += cname.length;
end = dc.indexOf(";", begin);
if (end == -1) end = dc.length;
return unescape(dc.substring(begin, end));
}
}
return null;
}

//delete cookie
function eraseCookie (name,path,domain) {
if (getCookie(name)) {
document.cookie = name + "=" +
((path == null) ? "" : "; path=" + path) +
((domain == null) ? "" : "; domain=" + domain) +
"; expires=Thu, 01-Jan-70 00:00:01 GMT";
}
}

//]]>
</script>
Once done, in order to set a cookie, we only need to put the name and the value in quotes when we call the function. Additionally, we will set the expiry date by getting the current Time (in milliseconds) and add the required number of minutes (in milliseconds):
var expiration = new Date();
expiration.setTime(expiration.getTime() + 10000); //Expire after 10 seconds
setCookie("cookiename","hello",expiration);
}
The above code sets a cookie called cookiename, with the hello value and set its expiry date to 10 seconds after it has been set (10000 milliseconds = 10 seconds). If we want to restore the value of this cookie, then we should use the second function with the cookie name:
var checkCookie = getCookie("cookiename");
By adding this code below <body>, we created a cookie with the value 'hello' which can be shown on the screen if we want to. The cookie will disappear after 10 seconds:
<script type='text/javascript'>
var expiration = new Date();
expiration.setTime(expiration.getTime() + 10000);
setCookie("cookiename","hello",expiration);
var checkCookie = getCookie("cookiename");
document.write(checkCookie);
</script>
The erase function is used in the same way as the one for reading just by clicking on the name of the cookie. The setCookie values for 'domain' and 'secure' are not utilized. Use 'domain' on the Javascript cookie if you are using it on a subdomain, where the cookie is set on the widgets subdomain, but you need it to be accessible over the whole yoursite.com domain.

The combination of these three functions will allow us to handle cookies for specific purposes, as we will see in the near future.

Does Google Penalize Online Casinos and Gambling-related Content?‏

11.11 0


Does Google Penalize Gambling-related content?

Casino and online gambling websites have trended over the past few years, and are extremely popular. It is not surprising to see more of such websites surfacing following the prowess of this niche. But the big question is, are these sites ethical? More importantly, does Google allow gambling and online betting-related content, such as blog posts on casinos, online casino reviews, etc. to be published to websites freely? Granted that Google can't control what content webmasters can put on their sites, but it sure can ensure which sites get high search rankings, and which don't.

Read more »

Top 10 Women Entrepreneurs of India in 2014

11.11 0


Women Entrepreneurs of India in 2014


"The whole point of being alive is to evolve into the complete person you were intended to be”, and really, there is a long list of women who have met their dreams by working really hard, leaving all men behind. Women’s day has just passed upon us and the day was motivating enough to appreciate some of the courageous women for their entrepreneur skills. Women are nowhere behind men whether it be in the field of business or technology and India itself is a good example where women are giving a good competition to all the capable men around with their business skills.


Here are 10 women entrepreneurs of India in 2014, have a look!

Read more »

How to Add CSS code To Blogger using Template Designer

09.56 0
If you are having difficulties adding the CSS codes in a Blogger template, here's a short guide that will show you a more practical and fast way to add CSS (Cascading Style Sheets) so that it will be easier for you to customize your blog.

Some readers have complained that when they had to add the CSS codes to install some feature in Blogger, they found it difficult to locate the ]]></b:skin> tag. So, I decided to make this quick tutorial to show you another way of adding the CSS without having to access the Blogger HTML editor.

Adding CSS via the Blogger Template Designer

Step 1. Log in to your Blogger account and select the blog that you want to customize.

Step 2. From the Blogger dashboard, choose "Template" and click on the "Customize" button.


Step 3. Click on the "Advanced" tab.

Step 4. Now just add your CSS code inside the right field, located in the "Add CSS" tab (if you have more options, you may need to scroll down the list). Here you can add any CSS code when you want to apply a new style to your template.


Step 5. Once added, click on the "Apply to blog" button to save the changes.

Following this method you can't edit the existing CSS styles already added in your template, which will require to access the template's HTML and make the modifications there. Here you can only add new styles and edit the existing styles added through the Template Designer panel.

It is also important to mention that when adding the CSS styles, it isn't required to put the <style type="text/css"> ... </style> style tags, which normally would go above the </head> tag of the template html. Adding those tags may result in an error.

If you change the template, the CSS added here will be removed. The same goes for any other additions or CSS customizations made ​​through the Template HTML editor.

How Women Entrepreneurs In Pakistan Are Using The Internet To Make Money?

10.11 0


How Can Women Make Money Online

Making money online is the dream of every student, housewife, job seeker, and even the employed. The challenges of unemployment and rising inflation today are simply too great, and people are turning towards alternative income sources to meet them. Granted that making money through the internet is not everyone's piece of pie, but there are thousands of women now in Pakistan who, with the help of the internet, have built their own businesses from scratch while staying at home!

Read more »

Details of Mohammad's Nationwide Interview On Radio FM 94

10.11 0


Mohammad's nationwide radio interview

As most of you might remember, we went live on-air in September last year when Mohammad Mustafa Ahmedzai, on behalf of the STC Network, gave an interview to Radio Planet FM 94. The three-hour long show mixed some fun and music into talks about entrepreneurship, and covered topics from blogging, making money online, and skill development. Today, we're going to do a recap of the event for those of you who joined in late, and do not know of this interview.

Read more »

How to add custom Variable definitions to Blogger

10.49 0
In this post we are going learn about the CSS Variable Definitions for Colors and Fonts that could be found at the top of the style sheet of a Blogger blog. The values for the Variable definitions can be modified directly through the Blogger Template Designer where are the settings for colors, backgrounds, fonts and font sizes.
blogger variable definitions

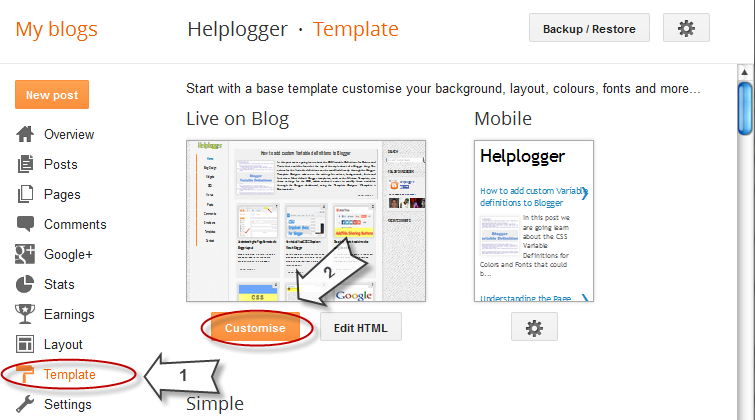
Most default Blogger templates, such as the Minima Template, use these settings for the CSS, which makes it easier to modify these variables through the Blogger dashboard, using the "Template Designer" (Template > Customize) editor and accessing to the "Advanced" section.

blogger template designer, variable definitions

If the definitions are already established in the CSS, we'll be able to change the background colors, font colors, styles or sizes, directly from our Blogger dashboard without having to touch the HTML code of our template.

If these values ​​are not set, we can define them by creating our own variables. The more variables are created, the greater will be the ease of changing colors and fonts of the Page Elements by going to the "Template Designer" and accessing the "Advanced" tab.
In some cases, we can't change the color or font of a particular template if the designer has not implemented the variables in the template and didn't defined and specified a particular value directly into a property, and if there is no definition for these values​​, we may not be able to customize it through the Blogger's Template Designer.

There are two types of variables:

1) Color Variable:
<Variable name="body.background.color" description="Outer Background" type="color" default="#66bbdd" value="#66bbdd"/>
In red is the variable name. Here you can put any name you want, however, it must not contain spaces, that's why we may see some variable names using a dot "." between each word.
In green is the description that will appear in the Fonts and Colors panel (it can contain spaces).
In blue is variable type, which in this case is "color"
In purple is the default value, which runs in the absence of any other value.
In orange is the value of the selected color.

2) Font Variable:
<Variable name="body.font" description="Font" type="font" default="normal normal 12px Arial, Tahoma, Helvetica, FreeSans, sans-serif" value="normal normal 12px Arial, Tahoma, Helvetica, FreeSans, sans-serif" />
In red the variable name without spaces.
In green the description of the variable, may contain spaces
In blue is the type of the variable, which in this case is font.
In purple the default font.
In orange is the font that you choose.

We can find the variables definitions in the <head> section of our Template by accessing the HTML code (click on the Edit HTML button). There we should see a pair of <b:skin>..</b:skin> tags. The CSS style declarations will go in between those tags, along with the variable names.

variable definitions

How to Create Variables with type Color

Now, let's see how we can create type="color" variables in our template.

Please copy the below snippet and replace the names and types as you like, then paste the code below this comment:
/* Variable definitions
   ====================
Code to copy:
 <Variable name="NAME" description="DESCRIPTION" type="color" default="#xxxxxx" value="#xxxxxx" />
For a better understanding, let's take a look at this example with variable of type "color":
<Variable name="variablecolor" description="Variable with light blue color" type="color" default="#DDF2FF" value="#DDF2FF" />
color variable type

Here I have created a variable of type "color", with the "variablecolor" name. The color values (#DDF2FF) can be applied to all the borders of my blog and whenever I want to apply color styles to a specific border, I will type it like this:
border: 1px solid $variablecolor;
Note that I have added the "$" symbol before the variable's name which should be added everytime you want to implement a new variable definition.

Once we have created the variable, we can apply it on any property (not only borders) of any selector (page element) where it is possible applying the chosen color.

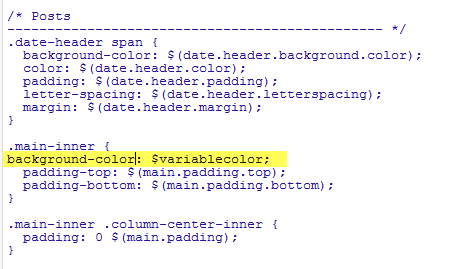
For example, if I want to add this color in the main-inner background (sidebar and posts area), I will add it just after the "main-inner" class selector, like this:
.main-inner {
background-color: $variablecolor;
}
variable type color, variable definitions

Now that a new variable has been established, save and return back to the blogger dashboard by clicking on the "Customize" button > Advanced tab. You will notice that there is a new variable called "Variable with light blue color" - to change the color, just use the color picker tool.

blogger template designer

How to Create Variables of type Font:

Now let's say I want to create a new variable of type="font" which I want to apply on the title of the sidebar gadgets. I will add it this way:
<Variable name="gadgetstitlefont" description="Gadgets Title Font" type="font" default="normal normal 16px Arial,Verdana,'Trebuchet MS',Trebuchet,Sans-serif"  value="normal normal 20px Cambria"/>
In this variable that I just created, the default font to be searched by the web browser should be Arial, and in its absence, Verdana and so on. Otherwise, apply the Cambria font which is actually the font that we want and which can be easily changed by accessing the Blogger Template Designer.

Once the font variable has been implemented, we can add it to any property of any selector where we want to define this font style.

To define where this variable should be applied (which, in my example, is the title of the sidebar gadgets), I will need to include the values ​​directly in the "h2" property of the "sidebar" (sidebar-right-1) selector, by creating the following CSS rule:
#sidebar-right-1 h2 {
font: $gadgetstitlefont;
}
And I will add this above the ]]></b:skin> tag of the Template (don't forget to add the "$" symbol before the variable's name, otherwise it won't work).

variable font type

Now that we have given a new variable, Save the template and return to the Blogger dashboard by clicking on the Template > Customize button and access the Advanced tab. Scroll down and you will notice that there is a new variable named "Gadgets Title Font" - if you want to change the font type or size, you can do it directly by using this panel.

variable font type advanced

After you've decided what font style should be applied, click on the Apply to blog button on the right side.

apply to blog button

As you work on your template design, you can add lots of variables for different colors and fonts, however, for other types of CSS attributes, there's not necessary to create variables. The other types (such as margin, padding) can be included in the HTML of the template (above ]]></b:skin>) just as they normally would be.

Creative Tips To Use Twitter For Growing Your Business

10.11 0


Creative ways to use Twitter for Business

If you think Facebook is the most important network for increasing your audience and growing your business, then think again. You can drive better engagement through Twitter, because at Twitter, people are listening, instead of just blabbing around like at Facebook. Twitter interactions always turn out to be more fruitful, and Twitter followers usually prove to be more engaging. There are various ways you can use it to your advantage. Here are some creative ways you can use Twitter for growing your business.

Read more »

How To Make The New Facebook Algorithm Work For Your Page?

10.11 0


Increase your Facebook Page's Reach

Facebook, it seems, has taken out a leaf out of Google's books, and has started rolling updates to its EdgeRank algorithm - a scheme to rank content from Facebook pages based on a variety of different factors. Recently, many page admins have saw a significant drop in their total reach, and especially their organic reach. Organic reach is crucial for small businesses who don't have a vast budget for an extensive ad campaign. You can make this algorithm change to your advantage.

Read more »

Understanding the Page Elements of a Blogger Layout

08.31 0
When following a tutorial to add a gadget/widget or make some customizations in a Blogger blog, some new users may not know the meaning of certain terms, and sometimes, it may be harder to locate them. As for the gadgets, usually it is required to access the blog's layout in order to add or arrange any of the page elements.

For a better understanding, here are some basic explanations about the Page Elements located in the Layout section of a Blogger dashboard.

What are the Page Elements?

Page Elements is, basically, the body of our blog. To access the Page Elements, we need to click on the "Layout" option in the Blogger dashboard.


Understanding the Page Elements sections

The Blogger Layout is made of "sections and elements". The sections mark certain areas of a page. Every section is represented by the tag <b:section> and has an unique "ID" that names its element which is followed by a "class" tag. Each section has some attributes and through these, we can determine the number of elements allowed in the section and if this section gives the option to add a "page element".


Let's take a look to an example of the default code related to the header section found in the HTML of a Blogger template:
<b:section class='header' id='header' maxwidgets='1' showaddelement='no'>
<-- rest of the code -->
</b:section>
Breaking apart the code above:
  1. <b:section is the opening tag of the section.
  2. class='header' - describes the existing group inside the "header" element
  3. id='header' - identifies and specifies the header as a single element.
  4. maxwidgets='1' - determines the number of elements allowed in the "header"; here we have the number of gadgets that we can include in the header section. In this example, '1' means that this section allows us to add only a gadget.
  5. showaddelement='no' - the 'no' attribute means that the header will not show the "Add a gadget" link or we won't be able to move any Page Elements. To activate this option so that we can add new Page Elements (Add a gadget), we should change 'no' to 'yes'. By setting the "showaddelement" attribute to 'yes', we'll be able to arrange the elements as we like, just click on the element that you want to move and drag & drop it wherever you want.
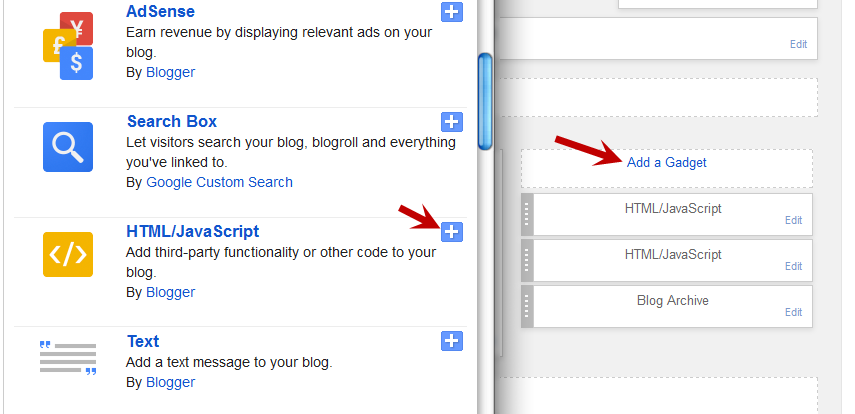
The spaces reserved for adding elements in the existing sections are called Gadgets (or Widgets). You can easily add various Page Elements by clicking "Add a Gadget" link. This will open a pop-up window for you to pick and choose which elements should be added. Click on the Gadget's title or on the blue plus sign symbol to add it to your blog's layout.


After you have added a page element, gadgets can be moved up, down or sideways. You can put them wherever you want. Of all the existing gadgets, the most used is the "HTML/JavaScript". Inside this gadget (widget) you can insert any code, as long as it is in the HTML or JavaScript language.

Each time you decide to add a new gadget, click on the "Add a gadget" link in the area where you want to add it. For example, if you want to add a JavaScript code and want it to appear in the sidebar, you should click on the "Add a gadget" in the "sidebar" section, choose the "HTML/JavaScript" option and paste the code in there.

Once you have added new gadgets (widgets), it is recommended to check the changes by clicking on the Preview button before saving anything. So, if something went wrong, you simply click on "Clear" so that everything that was not saved to return to its previous state. If the position of any Page Elements (Gadgets) has been rearranged, you will need to click on the Save arrangement button in order to see the changes.

Arsip Blog