How To Create Custom Widget Areas With Genesis In WordPress?

10.11 0


How To Create Custom Widget Areas With Genesis In WordPress

So, we're back with another one of our Genesis tutorials, and this time, it's much easier, and much handier. Today, we'll talk about creating a custom widget area with Genesis in WordPress. When you install a theme on WordPress, you get limited customization options, and there are only so many widget areas you can place your widgets on. And since almost all of the customizations needed on Genesis requires the installation and usage of plugins and widgets, having special widget areas in special places to keep certain widgets is a key requirement. The answer is to create a custom widget area wherever you want, and then easily add widgets to it.

Read more »

How To Setup AdSense A/B Experiments for Ad Units

10.11 0


Google AdSense Experiments

Being a predominantly blogging and online income blog, one of the most common questions we get asked here at MBT is, what is the best AdSense Ad Configuration for generating maximum revenue. In all honesty, this question is always very difficult to answer, since the description of 'best configuration' can be subjectively varied from blog to blog, meaning its hard (probably impossible) to create a set-up that works for every blog. The best way to address this issue is to try out various configurations on your blog, and decide by hit or trial which is best. Fortunately for you, the Google AdSense experiments feature is here to help.

Read more »

How To Publish WordPress Posts From Microsoft Word 2013‏?

10.11 0

How To Publish WordPress Posts From Microsoft Word 2013‏?


WordPress is a very powerful publishing platform, and a very popular one too since more than 45% of blogs are hosted on WordPress. Its major selling point has to be its powerful functionality coupled with an intuitive and user-friend user interface. But if I were to pick out one flaw in WordPress, it would have to be the droll post editor combined with a slow UI that makes editing and saving posts a headache. But what if you could write your blog posts into a powerful word processing software such as Microsoft Word? As it turns out, you can! In this post, we'll show you how to create and publish a blog post directly from MS Word 2013!

Read more »

Easy Recovery For Sites Hacked With Spam or Malware

10.11 0

Recover hacked sites with Google Webmaster Tools


One of the top few concerns of a webmaster is the ever-persistent sense of insecurity. No matter how secure your site is, there will always be loopholes providing malicious programs an entry into your system, and thus enabling them to inject spam or malware. In spite of all preventive measures, the best and most practical thing to do in such an event is to recover your site as fast as possible so that the effect of the attack is neutralized / minimized. And with Google Webmaster Tools, you can now take a step forward towards easier and faster website recovery.

Read more »

How To Create Swipe Views in Android App?

10.11 0


Android Swipe Views

Well, hello guys. We are back with a new useful Android tutorial. In this tutorial, I will explain how you can add “horizontal swipe views” to your android application by using “ViewPager”. Horizontal swipe views allow app users to swipe to their left or right, and be presented with a new screen. You see this often on your home screen, in your music player apps, social networking apps (like Facebook), contacts, call logs, etc. It accounts for excellent navigation of your app, and is marginally preferred to scrolling a long page. So let's get started!

Read more »

How To Create A Simple Web Browsing App For Android?

10.11 0
How To Create A Simple Web Browsing App For Android?
Did you know that you can create a basic web browsing android app for your website with just a few lines of code? Web browsing Android apps are great if you have a nice website and you want to make your brand’s application with just a minimal amount of code. At the same time, it is a great way to learn more about Android application development, and it doesn't require a background in application development. So, in this tutorial, I will teach you how to create a basic web browsing app of your own!
Read more »

HostGator Reseller vs Dedicated vs Shared hosting

10.11 1


HostGator


With over 8 million domain names served, HostGator is one of the most popular web hosting companies today. The Houston-based company has met with remarkable success, and has been able to keep its customers loyal with its superb service, cheap rates and secure experience along with a handful of useful features and tools that make hosting a website a piece of cake. HostGator provides three major hosting plans; Shared, Dedicated and Reseller - all of whom serve different purposes. If you can't seem to decide between them, then this post will help you choose the best hosting plan that best suits your needs.

Read more »

Recent Rotating Post Gadget with Excerpt For Blogger

05.41 0
This Javascript code will display the latest posts of any feed with the distinction of having two parts that can be used individually or combined. At the top this widget will show a single post along with the title (link), author, date and a brief summary of its content. In addition, this post will rotate automatically within a list whose number of elements will be decided by us. At the bottom, we'll find a full list with chosen posts that will change the post above when we mouse over them, thus breaking the automatic cycle.
recent posts widget for blogger
Before installing anything, let's see it in action to decide if it does what we want.


Loading...

How to Add Recent Rotating Posts Widget to Blogger


Step 1. Go to Layout > click on Add a Gadget link.


Step 2. From the pop-up windows, choose the HTML/Javascript gadget


Step 3. Paste this code inside the empty box:
<style>
.gfg-root {
width: 100%;
height : auto;
position : relative;
overflow : hidden;
margin: 0 auto;
text-align : center;
font-size: 12px;
border: 1px solid #DBDBDB;
}
.gfg-title {
font-size: 16px;
font-weight : bold;
color : #6B6B6B;
background:#F3F3F3;
background-repeat: repeat;
line-height : 1.4em;
overflow : hidden;
white-space : nowrap;
padding: 5px;
text-shadow: 0px 2px #fff;
}
.gfg-entry {
background-color: #FFFFFF;
width : 100%;
height : 9.2em;
position : relative;
overflow : hidden;
text-align : left;
margin-top : 3px;
}
.gf-title a {
text-transform: capitalize;
color: #0000ff;
font-size: 14px;
}
.gfg-subtitle {
display: none;
}
.gfg-list {
position : relative;
overflow : hidden;
text-align : left;
}
.gfg-listentry {
line-height : 1.5em;
overflow : hidden;
white-space : nowrap;
text-overflow : ellipsis;
padding-left : 15px;
padding-right : 5px;
}
.gfg-listentry-odd {
background-color : #F3F3F3;
border-bottom : 1px dotted #CCCCCC;
padding: 5px;
}
.gfg-listentry-even {
background-color : #F3F3F3;
border-bottom : 1px dotted #CCCCCC;
padding: 5px;
}
.gfg-listentry-odd a{
color: #595959;
padding: 0 0px 0 10px;
}
.gfg-listentry-even a{
color: #242424;
padding: 0 0px 0 10px;
}
.gfg-listentry-highlight {
background: #FFFFFF;
}
.gfg-listentry-highlight:before {
position: absolute;
left: 0;
content: '\25BA ';
font-size: 14px;
color: #DBDBDB;
}
.gfg-listentry-highlight a {
color: #242424;
}
.gfg-root .gfg-entry .gf-result {
position : relative;
background-color: #ffffff;
width : auto;
height : 100%;
padding-left : 20px;
padding-right : 5px;
}
.gfg-root .gfg-entry .gf-result .gf-title {
font-size: 14px;
line-height : 1.2em;
overflow : hidden;
white-space : nowrap;
text-overflow : ellipsis;
margin-bottom : 2px;
margin-top: 5px;
}
.gfg-root .gfg-entry .gf-result .gf-snippet {
height : 3.8em;
color: #000000;
margin-top : 3px;
}
.clearFloat {
clear : both;}</style>
<script src="http://www.google.com/jsapi" type="text/javascript"></script><script src="http://www.google.com/uds/solutions/dynamicfeed/gfdynamicfeedcontrol.js" type="text/javascript"></script>
<script type="text/javascript">
function showGadget() {var feeds = [{title:'List',url:'http://helplogger.blogspot.com/feeds/posts/default?redirect=false&start-index=1&max-results=10'},];
new GFdynamicFeedControl(feeds, 'feedGadget',{title: 'Latest Posts', numResults : 10, displayTime : 5000, hoverTime : 500});} google.load("feeds", "1");
google.setOnLoadCallback(showGadget);
</script>
<div id="feedGadget">Loading...</div>

Customizations:

The url in blue is the feed address. Obviously, the http://helplogger.blogspot.com address should be replaced with yours.

Next is start-index=1. This number indicates which post will appear first on the list. By default it is the latest post published on our blog, so if we want to begin displaying older posts, we need to change the 1 value.

max-results=10 indicates the maximum number of posts that we will be reading from the feed, beginning from the one that we have set up before in the start-index=1. This number always needs to be equal or greater to what we should see later and its purpose is to set the number of posts that will be shown in the gadget. The easy thing would be to put 500 in order not to fail, but the higher the number is, the longer the gadget will take to load, so it's better to adjust to what we need to show.

Finally here are some other parameters of the script:

title: 'Latest Posts', is the widget's title that appears on top.
numResults: 10, number of posts that will show in the list
displayTime: 5000, the delay time between posts in the rotator (in milliseconds)
hoverTime: 500, minimum time for an item in the list to be displayed at the top.

If you want to hide the list and show only the posts, then change this part:
.gfg-list {
position : relative;
overflow : hidden;
text-align : left;
}
 to :
.gfg-list {
display:none;
}
and if you want to display only the list, then change this part:
.gfg-entry {
background-color: #FFFFFF;
width : 100%;
height : 9.2em;
position : relative;
overflow : hidden;
text-align : left;
margin-top : 3px;
}
to:
.gfg-entry {
display: none; }

Step 4. Save the gadget and you're done. Enjoy!

How to Fix Blog Post URLs ending with #gsc.tab=0?

10.11 0


How to Fix Blog Post URLs ending with #gsc.tab=0?


Are you currently facing problems with your blog post URLs, and constantly notice the '#gsc.tab=0' search parameter appended at the end of those URLs? Chances are that this is caused by an instance of a custom Google Search Engine on your website. Many bloggers and webmasters prefer to provide search functionality to their users within their sites. More often than not, if you see a search bar on a website that is content-based, and not a classified, eCommerce, catalogue, travel, or job listing website, then that search would be powered by Google - that's how popular Google is! Anyhow, in this post, we'll talk about removing the '#gsc.tab=0' error from your blog URLs.

Read more »

Add GooglePlus Followers Badge to Blogger

10.11 0

Google Plus Badges


Adding Google Plus widgets on your website helps you drive more visitors over to your Google Plus properties, and ultimately increasing your follower-ship for long-term effects. Google provides various tools and resources for creating and adding Google Plus widgets to your site. The Google Plus Badge is a common widget bloggers use on their sites. Google Plus has just updated their Badges, making them more flexible, feature-rich, and easy to implement. In this post, we'll talk about how to add a Google Plus followers badge to Blogger.

Read more »

How To Monetize Mobile Sites For Revenue?

10.11 0


How To Monetize Mobile Sites For Revenue?

Since the rapid growth of the mobile web, optimizing your website for mobile devices has become more of a necessity. You can tap a lot of your website's potential by going mobile. We recently discussed some best ways to optimize your website for various mobile devices. Each method has its advantages, but given the type of your audience, one of them might be more suited for your website than others. In this post, we'll talk about how you can monetize your mobile solution to generate income.

Read more »

Scriptaculous image slider/carousel for Blogger

08.33 0
Image galleries, sliders and slideshows have become increasingly popular within web pages and more and more developers have been creating these amazing powerful, versatile and sleek galleries. In this tutorial, I will show you how to display the relevant content in an attractive and usable manner, by adding this beautiful carousel slideshow made by Brian R. Miedlar which will display a gallery of images with a cool sliding effect.
image slider for blogger

blogger widgets, blogger slider

If you need to see this carousel in action, please visit this demo blog.

How to Add the Scriptaculous Image Slider on Blogger


Step 1. Log in to your Blogger Dashboard and select your blog

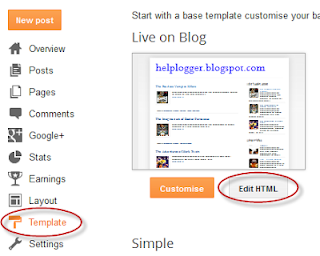
Step 2. Go to Template and click the Edit HTML button:


Step 3. Click anywhere on the code area and press the CTRL + F keys, then search this tag:
</head>

Step 4. Just above the </head> tag, add this code:
<script src='http://www.google.com/jsapi'></script>
<script>
google.load("prototype","1.7.0.0");
google.load("scriptaculous", "1.9.0");
</script>


<script language='javascript' src='http://helplogger.googlecode.com/svn/trunk/Image Carousel/os.js' type='text/javascript'/>
<script language='javascript' src='http://helplogger.googlecode.com/svn/trunk/Image Carousel/carousel.js' type='text/javascript'/>
<script language='javascript' src='http://helplogger.googlecode.com/svn/trunk/Image Carousel/application.js' type='text/javascript'/>
Note: If you already have Scriptaculous and Prototype, it's not necessary adding the code in red.

Step 5. Now search for the following code (take a look at the screenshot for more details):
]]></b:skin>
image carousel, blogger image slider, blogger widgets
Screenshot
Step 6. Just above it, add the code below:
.carousel {
position:relative;
clear:both;
left:20px; /* Distance from left */
margin-top:10px;
margin-bottom:20px;
border:2px solid #000; /* Carousel border */
background-color:#333333; /* Background color */
}
.carousel .navButton { cursor:pointer; display:block;
text-indent:-9999px;
background-repeat:none;
z-index:10;
}
.carousel .container {
position:absolute;
overflow:hidden;
}
.carousel .items {
position:absolute;  }
#Carousel2 {
height:88px; /* height of the container */
width:685px; /* width of the container */
}
#Carousel2 .container {
left:26px;
top:12px;
width:630px; /* width of the images container */
height:100px; /* height of the images container */
}
#Carousel2 .items { top:0; left:2px;
width:1700px; /* overall width of all the thumbnails */
}
#Carousel2 .item { height:70px; width:70px; float:left; clear:right; }
#Carousel2 .item .icon img { position:relative; left:0px; width:65px !important; height:65px; cursor:pointer;}
#Carousel2 .navButton { position:absolute; bottom:0px; width:24px; height:87px; }
#Carousel2 .navButton.previous { left:0px; background-image:url(https://blogger.googleusercontent.com/img/b/R29vZ2xl/AVvXsEidisJUdD6qa5Y7Frx3tUfSEseCcVcyJTS88zjQ0m1i6XSB7p8Q2bjco98rHOEkutiCt4KCqJ3uzEuegsN9e0RVyL091SE-3XcjvnJcoCPDC34ZtbE0-8KIgEIeTUpkYtHvUP0ed_ceUC4/s1600/button-left.png); }
#Carousel2 .navButton.next { right:2px; background-image:url(https://blogger.googleusercontent.com/img/b/R29vZ2xl/AVvXsEh5-veJOMtXeZ-3qnzBlNugjp_UYgPaSHkAzPHthPbT9kP8VBIV4a5AlEsD2IKVo1VkWajQbxbFfAMswKuxkrAlnIz_uGdY8CthYSGhnM5DaoswT8puGhbpH08Zp2jVgS3Op716BLhRgeY/s1600/button-right.png); }
#Carousel2 .item .key { display:none;}
#Carousel2 .item .picture { display:none;}
Here, I have put some styles in green that can be customized as you want , such as the border color and the background color. The arrows are images, so if you want to change their color or use other pics, you have to change the two URLs in blue.
The width of the carousel is of 685px, so below the header might look good. If you want to change the length, then you need to change the /* width of the container */ (which is the size of the entire carousel), the /* width of the images container*/ (which is the area that shows the thumbnails) and the /* overall width of the thumbnails */ which is the actual width that all the thumbnails occupy.

Step 7. In order to save the changes, click the Save Template button

Step 8. Finally, go to Layout and click the Add a Gadget link, then choose HTML/Javascript from the pop-up box and paste the structure of the carousel inside the empty box:
<div id="Carousel2" class="carousel">
<div class="button navButton previous" style="display:none;">Back</div>
<div class="button navButton next" style="display:none;">Forward</div>
<div class="container">
<div class="items">

<div class="item">
<div class="key caption">Thumb</div>
<div class="icon">
<a href="link URL"><img width="65" height="65" src="image URL" /></a></div>
<div class="picture"></div>
</div>

<div class="item">
<div class="key caption">Thumb</div>
<div class="icon">
<a href="link URL"><img width="65" height="65" src="image URL" /></a></div>
<div class="picture"></div>
</div>

<div class="item">
<div class="key caption">Thumb</div>
<div class="icon">
<a href="link URL"><img width="65" height="65" src="image URL" /></a></div>
<div class="picture"></div>
</div>

<div class="item">
<div class="key caption">Thumb</div>
<div class="icon">
<a href="link URL"><img width="65" height="65" src="image URL" /></a></div>
<div class="picture"></div>
</div>

<div class="item">
<div class="key caption">Thumb</div>
<div class="icon">
<a href="link URL"><img width="65" height="65" src="image URL" /></a></div>
<div class="picture"></div>
</div>

<div class="item">
<div class="key caption">Thumb</div>
<div class="icon">
<a href="link URL"><img width="65" height="65" src="image URL" /></a></div>
<div class="picture"></div>
</div>

<div class="item">
<div class="key caption">Thumb</div>
<div class="icon">
<a href="link URL"><img width="65" height="65" src="image URL" /></a></div>
<div class="picture"></div>
</div>

<div class="item">
<div class="key caption">Thumb</div>
<div class="icon">
<a href="link URL"><img width="65" height="65" src="image URL" /></a></div>
<div class="picture"></div>
</div>

<div class="item">
<div class="key caption">Thumb</div>
<div class="icon">
<a href="link URL"><img width="65" height="65" src="image URL" /></a></div>
<div class="picture"></div>
</div>

<div class="item">
<div class="key caption">Thumb</div>
<div class="icon">
<a href="link URL"><img width="65" height="65" src="image URL" /></a></div>
<div class="picture"></div>
</div>

<div class="item">
<div class="key caption">Thumb</div>
<div class="icon">
<a href="link URL"><img width="65" height="65" src="image URL" /></a></div>
<div class="picture"></div>
</div>

<div class="item">
<div class="key caption">Thumb</div>
<div class="icon">
<a href="link URL"><img width="65" height="65" src="image URL" /></a></div>
<div class="picture"></div>
</div>

<div class="item">
<div class="key caption">Thumb</div>
<div class="icon">
<a href="link URL"><img width="65" height="65" src="image URL" /></a></div>
<div class="picture"></div>
</div>

<div class="item">
<div class="key caption">Thumb</div>
<div class="icon">
<a href="link URL"><img width="65" height="65" src="image URL" /></a></div>
<div class="picture"></div>
</div>

<div class="item">
<div class="key caption">Thumb</div>
<div class="icon">
<a href="link URL"><img width="65" height="65" src="image URL" /></a></div>
<div class="picture"></div>
</div>

<div class="item">
<div class="key caption">Thumb</div>
<div class="icon">
<a href="link URL"><img width="65" height="65" src="image URL" /></a></div>
<div class="picture"></div>
</div>

<div class="item">
<div class="key caption">Thumb</div>
<div class="icon">
<a href="link URL"><img width="65" height="65" src="image URL" /></a></div>
<div class="picture"></div>
</div>

<div class="item">
<div class="key caption">Thumb</div>
<div class="icon">
<a href="link URL"><img width="65" height="65" src="image URL" /></a></div>
<div class="picture"></div>
</div>

<div class="item">
<div class="key caption">Thumb</div>
<div class="icon">
<a href="link URL"><img width="65" height="65" src="image URL" /></a></div>
<div class="picture"></div>
</div>

</div>
</div>
</div>
Add the links and images addresses. The link URL is optional, so you can add the addresses only when if you want to link the images to some posts.

If you add more images or remove some, you need also to change the width of the thumbnails, otherwise some pictures will appear behind the others.

If you want to add more pictures, just add before the </div> tag, a piece of code like this:
<div class="item">
<div class="key caption">Thumb</div>
<div class="icon">
<a href="link URL"><img width="65" height="65" src="image URL" /></a></div>
<div class="picture"></div>
</div>
And in case you want to align the gadget, just change the part from Distance from the left to another value.

How To Easily Create A Forum On A WordPress Site?

10.11 0

Create a Forum with WordPress


Forums are a great way to manage and increase user interactions on your website. They can be used to build online communities. Creating a forum on your website can be a daunting task, but the availability of the many free and open-source forum software make it really easy. The real issue might arise when integrating one of these with WordPress, without having to create forums on a separate sub-domain (and hence as a separate site). Fortunately, you have a solution for that as well in bbPress - the most popular forum software for WordPress.

Read more »

Updated Google AdSense Payments and Account Settings

10.11 0


Updated Google AdSense Payment Settings

If you've been actively following your AdSense progress lately, then you will have noticed that Google has made quite a few changes in the Payments and Accounts Settings pages in your account. This is because Google has made efforts to improve its Payments systems, which are now more flexible, and offer a lot more benefits to the users. This initiative comes right after Google's plan to update the Terms of Service for all products under Google.

Read more »

How to Write SEO Optimized Blog Posts

12.13 0
I'm not a SEO Expert, nor what you will read further is a top secret, but this is about the basic optimization that everyone should apply in order to write seo optimized blog posts. And with these techniques, effort, and a bit of patience, you can occupy the best places in the search results of different search engines.

Obviously, not all scenarios are the same, neither all blogs are positioned in the same manner, some might have greater competition than others depending on how popular is the topic that they handle; therefore, when it comes to web ranking, there's no specific time that applies for all. Having said this, let's get into the subject.

Focus on a topic

Whatever the topic of your blog is, when you try to write a seo optimized blog post, focus on a specific subject that has a clear purpose, with no distractions. For example, if you write about "Digital Cameras", then the beginning and ending of your post should be only about it. Don't start talking about digital cameras and end up telling about what you have done last weekend. A reader goes to a page because is looking for a specific information. So, unless it is not a personal blog (where you write about your daily life), do not deviate from the topic.

Define the post title

The post title should be short and to the point, so that you can briefly summarize the content of the post, but you shouldn't abuse this either. Although it has to be concise, don't try to 'save' words which might be keys to the search.

Examples:
Collection of all the cameras that have been released last year on the market
The best digital cameras of 2013
Clearly, the first one hasn't been defined very much, and the second one is not only more accurate, but it is also more relevant for what people are searching on the internet.

The keywords

Keywords are those terms that the most people are searching for on the internet and you should try focusing on them when writing a post; these keywords need to be included throughout the entire post, but be careful to not over-stuff keywords into your content.

Example:
During the fourth week of the technology, there were many products that are utilized today, and the most famous experts gave a speech on them.
At the opening of the fourth Technology Week, the experts talked about various topics, including how to choose a digital camera, had discussions about the pros and cons of the iPad, and which are the best smartphones.
In the first example, we have written without paying attention to any terms. While, in the second one, we used phrases that are searched on the internet by the most users.

So, the most popular keywords should be included wisely without cluttering your posts with them, or it can be counterproductive.

Again, these keywords should be included in the posts title, as well.

Rely on synonyms

While it's a good strategy to use specific keywords, we should not limit ourselves to a single word. It is recommended using synonyms because users do not name things in same way and using less keywords, we can avoid leaving the impression that we are being too repetitive and insistent.

Examples:
For those who like good quality pictures, Nikon D7000s Digital Camera is a 16.2 megapixel digital camera that takes great pictures.
For those who like good quality images, Nikon D7000s is a 16.2 megapixel digital camera that takes excellent pictures.
In the first example, we have repeated the word 'digital camera' and 'pictures' twice. While, in the second one, we used the digital camera keyword once and changed the word 'pictures' with 'images'.

This way, the reader will find a greater diversity of words and might enjoy the article more.

Using bold and italics

A good practice when you write seo optimized blog posts, would be to make the keywords bold by wrapping them in strong tags, so that they will stand out from the rest. But keep in mind that this shouldn't be done with CSS, but with HTML, i.e. they should not be tagged with font-weight: bold; but rather with <b> or even better, with <strong>.

Examples:
For those who like good quality images, Nikon D7000s is a 16.2 megapixel digital camera that takes excellent pictures.
The result seems to be the same, but it is not. Although these three keywords are in bold, only one is more attractive to robots, which is the first:
For those who like <strong>good quality images</strong>, <b>Nikon D7000s</b> is a 16.2 megapixel <span style="font-weight: bold;">digital camera</span> that takes excellent pictures.
The same goes for the italics. Use them for highlighting important words, but don't place them between font-style: italic; but rather between <i> or even better <em>.
For those who like <strong>good quality images</strong>, <em>Nikon D7000s</em> is a 16.2 megapixel <span style="font-style: italic;">digital camera</span> that takes excellent pictures.
Again, the first one has a better chance of ranking than the others. Thus, it is recommended to highlight the keywords in bold and italics, or to put them between <strong> and </strong>, or between <em> and </em>.

Using External Links

Some may say that we shouldn't use links in the posts because this way we are giving away our Page Rank. This is not quite true. Using referral links to sites that have already shaped their credibility, will also help us to shape our own. Certainly, we should not flood our posts with links, but we can do it when is needed and especially with sites that talk about the same topics as our own.

Another important thing to mention is that, we should avoid putting the typical "click here" or similar texts. When you put a link, the anchor text should be fairly descriptive.

Examples:
<a href="Link URL">Click here</a> to know more
More information about <a href="Link URL">digital cameras</a>
In the first example, the anchor text is not relevant and descriptive, but in the second it is.

Rank with your images

Posts with images are not only visually appealing, but might help the reader to understand what you are talking about. So, whenever you can, use an image in your post to illustrate the writing, but don't overdo it. Many images or very large images can slow the loading time of the blog.

New and relevant content

You should focus not only on writing many posts, but also making them relevant to your readers. New and original content is more attractive to the search engines, than a copy & paste (actually, the last gets penalized). So try to write new stuff, even if you think that all has been said. Each person has a different way of saying things.

Also, always get informed before writing a post. Do a research and see if the information is valid; based on that, you will gain the trust of your readers.

Final Words


With these few techniques you can increase the chances of ranking your posts higher in search engines. As I mentioned earlier, these aren't things that no one heard about, but I know that many are beginners and may not know how to write seo optimized blog posts.

It does not hurt repeating that the results won't appear overnight, but with some effort and patience, you should see the desired results over time.

7 Blunt Reasons Why You Don't Deserve to Blog!‏

10.11 0


7 Blunt Reasons Why You Don't Deserve to Blog!‏

Do you own a blog? If so, then you're among the 10% or so of the world's internet population that blogs. As many as a 250 Million blogs (possibly more) were known to exist in 2012, and the pace this number is growing at is astounding. But not everyone who blogs is worth their salt, and comparing this huge number of blogs to the blogs that are actually creating their own, original and unique content, we're only left with a handful. This is not to say that most blogs are useless and are only generating 'noise' on the internet. But many are. If you are blogging, then you should carefully evaluate yourself, and see whether you're not making any of the mistakes listed below. Because if you are, then frankly speaking, you're just wasting your time, and don't deserve to be blogging.

Read more »

Create a Custom 404 Page In Genesis For Empty Search Results

10.11 0


Create a Custom 404 Page In Genesis For Empty Search Results

The Genesis Framework is beaten by none when it comes to power and flexibility, and in many ways can be the best solution for your WordPress site. But the learning curve associated with the Genesis Framework could be steep, especially for beginners, and it might be hard to find the right customizations for your site. Here's a great one though. Ever noticed how when you search your site for some content, and and no results were found, Genesis always displays the same boring "Sorry, no posts matched your criteria" message? Today, we'll teach you to customize this text, add HTML styles and more to liven up your search results pages when no results were found.

Read more »

How To Track Site Search Terms in WordPress?

10.11 0

How To Track Site Search Terms in WordPress?


Google is one of the largest search providers, and almost every website that has a search widget is using Google Search to power the widget. This is especially true for blogs, since users site search on blogs more often than on websites. Finding out what users are searching for before landing on your website is extremely important. But so is finding what users are searching for within your site. The former can easily be gathered through Google Analytics, but what about the letter? You can use the Google Site Search tool to find out what people are entering in your WordPress search widgets.

Read more »

Google Introduces App Indexing Feature To Search Results

10.11 0


App Indexing

While browsing the web on your smartphone, have you ever felt the need to open up an app associated with the website you're on, and look for something in that app? For example, if I am on an eBook reading website, I might need to add a book ID given on the website in the reader app, or I might need to see a list of places on a map-reading app. Switching context from webpages over to applications can be annoying, and might not always give you what you wanted. To help address this issue, Google has announced a big addition to Google Search - App Indexing, which will help searchers look for information within mobile apps just like they would on websites!

Read more »

What Is The Best Way To Mobile Optimize Your Site?

10.11 0


Mobile Site Optimization


The concept of searching for content online using mobile devices is steadily on the rise, primarily due to the vast plethora of mobile devices and tablets now readily available in the market. They really seem to be advancing the cause, and more and more people are buying and using them. So how are these evolving trends changing things, and how does it effect you as a website owner? Previously, we have looked at various ways to optimize your sites for mobile devices. And there are more than one way to handle this problem. So what solution is the best for delivering content to mobile devices?

Read more »

How To Create A Custom GooglePlus Username?

11.11 0


Customize Google Plus Profile URL


Aah! At last! Just when we thought we would be stuck with the ridiculously long (and insane!) Google Plus profile URLs forever, Google finally announces a much anticipated feature on its social network; customizable profile URLs. Yes, that's right! It's time to join the Google Plus username bandwagon, because you can now get rid of those rusty old and chunky profile URLs, and get a nice Google Plus username and URL for your profile! Let's take a look at how you can create a personalized URL for your Google Plus profile!

Read more »

Arsip Blog